Sunday, November 28, 2021

EPDM Moisture Barrier for Hay Storage

I'm lucky to have a large area for hay storage, but I've had issues with the bottom layer of hay turning a bit moldy even though I store it on pallets to keep it off the concrete floor. This spring on a COTH thread I learned about using EPDM roofing material as a moisture barrier for hay storage. Unlike rubber stall mats, which in my experience can "sweat" on humid days, EPDM is specifically designed as a moisture barrier so it should buffer hay from ground dampness. Covering a large space with EPDM should also cost a lot less and require a lot less muscle than covering the same space with rubber mats.

When we had the roof replaced on our house, I was able to get a full roll of 12' EPDM from the roofing company for a pretty reasonable cost ($300). If you are patient and willing to call around, you might be able to find used or scrap EPDM for free or cheap, but I wanted to get it done soon before I restocked my hay supply.

When my hay supply ran low and I could reasonably move the remainder elsewhere, my wonderful niece and I lifted all of the pallets and swept out all the old chaff and dust and cobwebs. This was a deeply unpleasant task due to the dust and other allergens. We also found a disgusting pile of possible rat poop under one of the pallets. Face masks were a must! 

This doesn't look too awful pre-cleaning, but the space between the pallets is full of chaff, dust, cobwebs, and spiders.

With the pallets thoroughly cleaned, you can see the shocking amount of dust and chaff that had been hiding underneath them. So glad to get that out of there!

Next we replaced the pallets, disposing of some treacherously damaged or oddly sized ones and replacing them with nice solid ones from the pile at the feed store. I must not have taken a photo afterwards, but I ended up orienting all the slats in the same direction so that it's safer to walk across.

Of course there was one spot where I had to trim a pallet to get it to fit around a beam, and then cobble some scrap wood on to make it pallet-like again.

Then we unrolled the EPDM over the pallets, allowing plenty of overlap.

I trimmed the EPDM to fit it neatly around the beams. This stuff is not thick at all so trimming just requires a pair of scissors.

Here's the final product, trimmed to fit.

In theory the EPDM can go directly on the concrete with no need for pallets. I was too nervous to do that at first but I think I will get brave and remove the pallets before my next hay delivery. Pallets are not so fun to walk across when they're covered so you can't see the slats, even if you orient the slats in the same direction. I manage fine but I worry about someone else (husband, hay delivery guys) getting injured. Unlike stall mats, EPDM is extremely thin so it won't support your weight or stop you from turning an ankle in a gap between pallet slats.

About 8 months later, I haven't had any moldy bottom bales so the EPDM seems to be doing its job! It's also much, much easier to sweep out chaff and keep the area clean now that stuff can't fall down through the pallets. Cleaning the hay storage area can just be a minor maintenance chore instead of an annual sneeze-fest.

Tuesday, May 11, 2021

Stonedust Pad for the Gate Area

Last fall I added a stonedust pad to the gate area of my "winter paddock." It was a very worthwhile investment that basically eliminated the mud issue there. Here are some photos of the project, which I did in late September before the ground started turning muddy:

First I used the bucket of the tractor to strip the grass and top layer of dirt. I'm definitely no expert so the bottom was a bit wavy. I used the dirt to build up a low-lying area elsewhere on the farm. 

To choose the dimensions of the pad, I looked at photos from last winter to see how far out the mud extended at its worst, and tried to cover that area. This is what I came up with.

This is what almost 44 tons of stonedust looks like! At this point I was thinking I had gone a little overboard, despite doing some calculations and thinking I might even need a second load after this one (I did not!). This quarry calls it "31-#10 dry dust" and it was perfect for my purposes--not too stony, not too dusty! This pile cost $913 delivered.

Here I've spread out and flattened about half of the stonedust. I ran over it with the tractor repeatedly to compact it, in addition to using a rake and shovel to fine-tune the grade. There's still a pretty sizeable pile left for the second half. I ended up using some of the extra stonedust in the dry lot shed, where I had previously gotten a crappy load of super-fine stonedust that was dusty and didn't compact well. I also used some of it to build up thin spots in the path between the barn and the field, and some to make the gravel driveway more barefoot-friendly. I still have a small pile left for whatever comes up. All in all I feel like this pile has served me very well! 

After putting in the stonedust pad, I kept the horses off this paddock for a few weeks to let the stonedust get rained on and hopefully compact. This photo shows that when I then turned them out on it in November, the stonedust was quite deep and not as compacted as I would have expected.

To firm up the deep footing, I ran the tractor over the pad repeatedly again. You can see from the much shallower hoofprints that it was pretty effective. I haven't had to repeat the process or do any other maintenance since.

Here is the stonedust in action! In December 2019 (left) there was a fair amount of mud, compared to February 2021 (right).

Sunday, May 9, 2021

Winter 2020-2021 Pasture Management

 Last year (2019-2020) I experimented with allowing my horses access to one of my three acres of pasture all winter. It seems a bit silly after investing so much money in a dry lot (which is still well worth it to keep the high-traffic areas mud-free!), but it really makes the horses happy, cuts down on morning yahoos when I open the gate, and reduces the amount of manure I have to clean. I was quite happy with how well it worked out and how quickly that acre rebounded in the spring, so I thought I would post an update after this most recent winter. You can see last year's photos in a previous post

During the second year, I still found this a reasonable practice for my situation: two horses on three one-acre paddocks that get rotated the rest of the year and tend to be extremely lush in the spring. There were a few days here and there when I kept the horses in the dry lot after heavy rain or snowmelt to let the water drain a bit, but for the most part they had full-time access to the field. We had another average-to-above-average precipitation year here (not much snow though!).

I did make one really helpful improvement in 2020, which was adding a stonedust pad to the gate area of the "winter paddock." I'm going to do another post on that project very soon!

Here are some photos of how the paddock held up throughout the winter.

December 28

February 5

March 4
March 28. Not my traditional pasture photo, but I found it and was really impressed with how quickly the grass improved between this photo and the next one, only two weeks later. I think Z would prefer if it stayed a little muddy though!

April 11, after the first mow of the season

May 9, mid-mow

As you can see, the grass has rebounded extremely well again. This acre has been resting since the end of March (about 5-6 weeks) and the horses could have easily been back on it before now. I also should have mowed it again much sooner, but life got in the way.

Here's a comparison of the gate area in December 2019 (left) vs. February 2021 (right). I'm very pleased with how the stonedust has cut down on the mud and made the area much safer!

Friday, January 15, 2021

How Much Does it Cost to Keep a Horse at Home?

When deciding whether to bring your horses home, cost is a major factor to consider. But in fact, asking the title question ("How much does it cost to keep a horse at home?") is like asking "How long is a ball of string?" 

3,712-lb ball of string. Length? Unknown.

The answer is always: it depends. It depends on so, so many things that there really is no one true answer. You have to consider factors like:

  • How much hay will I need to feed?
    • In some areas the grass may grow year-round, whereas in others you may need to feed hay 6+ months out of the year
    • More land generally means more grass and less hay, but that depends on climate of course
    • It also depends on whether you have any special needs horses who can't eat much or any grass
  • How much land will I have?
    • The more land, the more maintenance, higher taxes, etc...
    • ...but in most climates more land = more grazing = less hay
  • What lifestyle will my horses have?
    • Stalling will cost you more in bedding and hay (not to mention time/labor cleaning stalls)
    • Full turnout is more likely to require footing improvements to mitigate mud or a dry lot to save your pasture during wet weather; it can also be labor-intensive in its own way, depending on your setup
  • What does hay and bedding cost in my area?
    • Hay prices especially vary a lot by region!
    • For a 50-lb bale of grass hay I've heard everything from $4 in rural, hay-growing areas to $25-30 in places like Florida where hay has to be imported
    • Hay prices also vary by year depending on the weather and growing season; I've personally paid between $6.50 and $11 per bale over the past six years, with prices generally trending upward, and with no real correlation between price and quality
  • Will I need to hire help?
    • Going out of town will be much more expensive than if you were boarding; for a small farm you should plan on at least $50-100 per day for a farmsitter
    • At minimum, you should have a backup plan in case of injury
If you are buying a larger, more expensive property than you would otherwise, you should also consider the additional cost of your mortgage, insurance, landscaping, snow clearing, etc. And if you're moving to the country from the city or suburbs, you should also factor in your longer, more expensive commute. You may even need to drive farther to buy groceries and other necessities. 

None of this even gets into what it might cost to build or upgrade horse facilities if you don't purchase a turnkey property, which is a whole other can of worms.

My nerdy self calculating horsekeeping costs

Marginal Cost of Another Horse

All that said, once you've brought your horses home and accepted all of the above costs, you may at some point wonder how much more an additional horse will cost. Perhaps your existing horse needs a companion, you'd like another riding horse, your spouse or child would like a horse of their own, you'd like a "guest" horse to take friends on trail rides, or you'd like to take on a resale project. By the time you're thinking of adding horses you should have a decent idea of what your existing horses cost. (If you want to see how I easily track my farm expenses, you can read a previous post here. And if you'd rather not do the math, I understand that too!)

I'll share my experiences with two horses whose expenses I tracked to the dollar. Both were resale projects so I wanted to know how much I was spending and whether I was actually going to make a profit (spoiler alert: the answer both times was no!). I wrote about the first, my adorable pony Gwen, previously here. As it turns out, the two horses ended up being at opposite ends of the spectrum in pretty much every way, including cost.

See what I mean about opposite ends of the spectrum??

Gwen (July 2018 - July 2019)
  • 13.2 hh Welsh/Thoroughbred mare who required small amounts of grain and hay and did not need to be stalled
  • Monthly "board" cost including grain, hay, and bedding: $50
  • During that time, I was paying $7-9 per ~50-lb bale of second cutting orchard grass hay and $75-85 per roundbale (in the winter)
Harry (July 2020 - December 2020)
  • 16.3 hh Thoroughbred gelding who required huge amounts of grain (10 to 12 lbs per day) and needed to be stalled during the day to eat
  • Monthly "board" cost including grain, hay, and bedding: $263 (although really this is an underestimate because I needed to stall my other two horses with Harry, whereas normally they would be on full turnout starting in about October)
  • During that time, I was paying $10 per ~50-lb bale of second cutting orchard grass hay
As you can see, I have experienced a pretty wide range of per-horse costs even at my one farm, and the range would be even wider if Harry hadn't sold before winter really set in.

Still, even $300 per month seems to me a pretty reasonable cost for an additional horse. In my area, board at a facility with an outdoor arena and excellent care typically costs at least $600 per month. Of course, the people running those facilities want to get paid for their time and labor, which I don't factor in myself. If caring for each additional horse takes half an hour per day (not counting grooming and riding of course), I can "pay myself" a whole $20 an hour and still break even! ($600 - $300 = $300 / (30 days in a month x 0.5 hours per day) = $20/hour)

So, despite the fact that I have yet to make money on a project horse, this is how I can justify someday adding a third horse to my herd again. 

Saturday, January 2, 2021

2020 Fox Photos!

Happy New Year! Here's hoping that 2021 is less weird. 2020 sure was a good time to live on a farm! I've decided that I should institute an annual post on the foxes who frequent our property.

Our original resident fox, Basil, tends to make regular appearances in the fall, winter, and spring. His favorite spot to curl up is under a tree near the little creek that runs between the house and the pasture. He usually doesn't even lift his head to look at me anymore, unless I deviate from my routine. I have a lot of grainy cell phone videos of him but every time I point the DSLR at him he flees.

This day in March 2020, I briefly managed to catch him unaware:


Until he woke up and took off:


He was feeling braver a few days later:


I had a good laugh when the trail cam caught him in this compromising position, looking quite offended by the intrusion:

(Yeah, it's from 2019 but it's too funny not to include.)

It also caught him with his breakfast one day (sorry, bunny!):


In the summer he spends less time curled up by the creek, but in 2020 he made more frequent daytime visits than ever before. One day he surprised us all by lying down in the sun right outside the barn, much to the delight of our very loud coonhound!


I managed to sneak into the barn and take an artsy photo through the window of handsome Basil framed by red twig dogwoods.

The frequency of his visits probably has something to do with the cat food in the barn:


In spring of 2020 we had the best surprise of all: cubs! In keeping with the herb/Simon & Garfunkel theme, we christened the second adult Rosemary and the cubs Parsley, Sage, and Thyme. To be honest we can't usually tell who's who anyway but it's fun to pretend. Sometimes there was even a third adult, so there seems to be some sort of interesting modern family dynamic going on here.


Proud dad, or mom, or aunt...who knows really but what a gorgeous red coat!

The cubs were around a lot this summer but when fall rolled around and new neighbors moved in next door with five dogs, the fox sightings sadly became less frequent. I saw Basil for the first time in months on Christmas Day, curled up in a ball under his favorite tree, then again the next week. I'm hoping as winter sets in he will visit more again!

Sunday, October 4, 2020

Homemade Hoof Supplement

I'll preface this post by saying that I am not a big supplement person because so many of them seem unlikely to result in anything but expensive urine. However, one of my Thoroughbreds came to me with crappy feet so I did a lot of research on how to help him grow healthy new hoof, and this is one area in which there's some scientific support for supplementation. I did a lot of research and cost comparisons, and I ultimately ended up mixing my own hoof supplement, which is less expensive than premade options and contains more adequate levels of some key ingredients.

Here is what some commercial hoof supplements cost, and what they contain:


Prices are as of the date of this post, including shipping whenever I could calculate it without entering personal information. This is certainly not an exhaustive list, as there are probably hundreds if not thousands of hoof supplements out there. It also doesn't include every ingredient in every supplement since that would make the spreadsheet unwieldy and impossible to post. Plus, 2 mg of lysine, for example, is such a drop in the bucket compared to what the horses take in from their grass, hay, and grain that it's hardly worth noting. I was primarily concerned about biotin, copper, and zinc so that's what I included.

Here are some sources of biotin, copper, and zinc:


I ended up choosing Uckele pelleted copper and zinc (because my horse is picky about powder) and Biotin Plus (which has a ground flax base and smells absolutely delicious). If I bought all those ingredients today it would cost me $24.48 per month. None of the commercial hoof supplements come close to providing the levels of copper and zinc that I can get for this price, except for Hay Harmony, which I discovered recently and might try when I finish my current bag of Biotin Plus. Since Uckele Biotin 2% requires such an incredibly low feeding rate (only 1 g of powder per day!) that might be worth a try too; $3.35/mo doesn't sound like much savings but in a year that adds up to $40.

One tip is to stock up on supplement ingredients during major sales, like Black Friday. They should keep for a long time if properly stored and you may save 10-20%. Buying large quantities at a time can buffer you from price increases too. 

4 oz cup of homemade supplement, with Biotin Plus on the bottom and Uckele pelleted copper and zinc on top. Cheaper and more environmentally friendly than SmartPaks or commercial hoof supplements!


Information on my ingredients

Biotin (a B-vitamin) is a very common hoof supplement ingredient. Some studies have found statistically significant improvements in hoof quality when horses are fed 15 to 25 mg of biotin per day. (Keep in mind that results won't be evident until the new hoof grows out, and that it takes 8 to 15 months for a horse to grow all new hoof.) Other studies have found no effect, but everyone seems to agree that reasonable biotin supplementation can't hurt and might help. For $10 per month, I thought it was worth a shot. (https://ker.com/equinews/biotin-basics/ and https://thehorse.com/130220/biotin-does-it-work/)

Why feed copper and zinc? The soil in my area is very high in iron, which means that the grass and water are as well. (To see soil nutrient levels in your area, go to the National Geological Survey website.) Many commercial horse feeds also contain added iron for some reason, despite most horses getting plenty from their environment. High iron intake negatively impacts the absorption of copper and zinc, which are crucial for connective tissue strength and many other functions.

"Copper supports enzymes that form the strengthening cross-links between collagen and elastin molecules in connective tissue. Deficiencies lead to abnormalities in bone, cartilage, tendons, ligaments, and arterial walls among the most dramatic consequences. In horses, copper deficiency has been linked to uterine artery rupture in mares, a fatal complication of labor. Copper deficiency is known to cause developmental bone disease in foals. From research in other animals we also know that copper deficiency has adverse effects in hair quality. Although it hasn't been studied in horses, remember that the ingredients and growth mechanisms for hair and the hoof are virtually identical.

Zinc performs a host of functions in the body. Structures on proteins called zinc fingers allow them to bind to DNA. Zinc fingers also influence the folding and structure of proteins. In enzyme systems, zinc is essential for pigment formation, antioxidant function, transport of carbon dioxide in the blood, bone building and remodeling, insulin production and release among others. (Eleanor Kellon, VMD, reprinted on https://www.hoofrehab.com/Diet.html)

"When the efficacy of hoof supplements is considered, the inclusion of zinc methionine along with biotin and 3 grams of methionine appears to result in greater growth of the stratum germinativum and the tubular horn of the hoof wall than does the feeding of biotin alone." (https://ker.com/equinews/trace-minerals-horses-zinc-copper/)

Saturday, August 8, 2020

Spreading vs. Composting Manure

A couple months ago, I decided I was fed up with shoveling stall waste into my compost bins only to shovel it back out again a short time later, and I decided to try spreading manure on the fields directly (post here). I think it is about time to update with the results of this experiment.

As expected, spreading the stall waste directly on the fields was a nice timesaver. Rather than dreading shoveling out the manure bin once a month or so in the summer, every week I hooked up the tractor, toodled on out to the field, and spent less than 10 minutes driving around emptying it. Bing bang boom, no shoveling involved. I monitored temperatures in the spreader as I would in the compost pile and found that even without any aeration, the waste would naturally heat to over 140 degrees, hot enough to kill weed seeds and pathogens.

My two horses were on stall rest at the time so they were filling the spreader up in about a week, and probably would have filled a compost bin in 3-4 weeks. As the horses started to get turnout again, I spread the waste on sections of the paddock that they weren't using.

The one downside is that I have to remove the tractor's PTO arms to use the spreader, which was kind of annoying when done on a weekly basis (though not nearly as labor-intensive as cleaning out the bin).

You may notice I'm writing in the past tense...this is because I stopped this method after about a month out of concern for how it was affecting my grass. Here are some photos:

This photo was taken just days after spreading some fresh stall waste and you can see how it already burned a swath of grass.

Close-up taken the same day as above.

Two weeks later, the very lush late-spring grass appears fully recovered.

As you can see, the grass suffered what I believe to be nitrogen burn from the direct spreading, which has never happened when I spread even briefly composted manure. At first I thought this might be caused by the added ammonium sulfate, so I cut down on how much I was adding and then stopped adding it entirely. The burn continued. The grass did recover within a couple of weeks, but I was concerned that it wouldn't once summer heat and dryness set in, so I stopped direct spreading and switched back to compost, despite its flaws.

I think the direct spreading method could be perfectly fine if you have more acreage and don't need it all for grazing, but since I have to spread on my meager three acres of pasture I really don't want to damage any of the grass.

So I was back to composting, and still wondering why it didn't seem to work very well for me. Fortunately my local Soil Conservation District has some great staff who can troubleshoot issues like this. One of their helpful staff members came out in June and after examining my compost pile (which involved standing in the full bin and digging a deep hole), he said: 

A couple fingers are pointing to the possibility of a moisture imbalance in your compost, which may be brought on by you selectively removing only urine-soaked shavings from the stalls. At least one of the people I talked to mentioned how without drier materials to reabsorb it moisture can migrate from the top of the pile to the bottom, causing anaerobic conditions in the bottom while limiting the ability of the waste material on the top to be composted. This may go far in explaining a bottom layer which was warm mud that smelled like ammonia, a middle which was hot and actively composting, and a top which was warm but not doing too much. This is not a dynamic that could be seen in a wheelbarrow from a barn or one that can be addressed by a forced air system. It is simply physics. Adding more dry shavings might help with it, but it may also skew your C-N balance.

So apparently I clean my stalls too efficiently by removing only the manure and soiled bedding? The thought of deliberately throwing away clean shavings just to make my compost pile happier is anathema to my frugal, anti-waste nature, so I am looking to switch from aerated compost to a traditional multi-bin system that can be turned with the tractor. Thankfully the county also assists with funding for projects like these. Meanwhile, I continue composting and until I have a better system I may just leave the gross "mud" in the bottom the next time I empty a bin, since the top seems to compost fairly well.

Looking down into the compost pile, you can see that it is much darker, denser, and wetter at the bottom. This pile accumulated from last fall to about April of this year (since the horses lived outside all winter, there wasn't much stall waste to deal with).

Wednesday, May 20, 2020

The End of Aerated Compost? 3-Year Retrospective

It has been almost exactly three years since I installed my O2 Compost aerated compost system so I have been thinking again about how it has worked for me.

As background, here are my previous posts on the system:

Bin Construction
The Composting Process
Spreading
Is It Right For You?
Pallet Floors for Air Pipes

After three years I have sort of a love/hate relationship with my compost bins. I love that I don't have to call some guy, wait for him to come swap dumpsters, then watch as he spins tires in my gravel driveway. Or better yet, as he blows his transmission because he doesn't know how to tow a heavy load and just decided to floor it, has his crippled truck towed across my backyard, then blames me for it all--true story!

I hate that emptying the bins requires so much backbreaking labor. The tractor can only do so much because the loader can't reach the back of the bins and can't fit around the aeration pipes. Even if the loader could reach, my wooden bins aren't sturdy enough to withstand being scraped and shoved by the tractor. A more permanent and expensive system with concrete sides and pipes recessed into the floor would be much easier to empty without manual labor but would also be, well, more permanent and expensive.

However, like any good farm owner, I'm used to hard work so what I really hate is that the "compost" looks almost exactly the same coming out as it did going in because I only have room for two bins so I usually can't let it cure. After a month or even two months of curing it still looks just like stall waste.

This has been curing for a month or two and yep, it's definitely still horse sh!t.
Circumstances allowed me to cure this compost for the longest I ever have, which was about 5-6 months. It has reduced in size somewhat and is drier than my usual batches, but it's still not that crumbly uniform compost that I was hoping for. Further down and along the wall between the two bins it was still pretty wet.
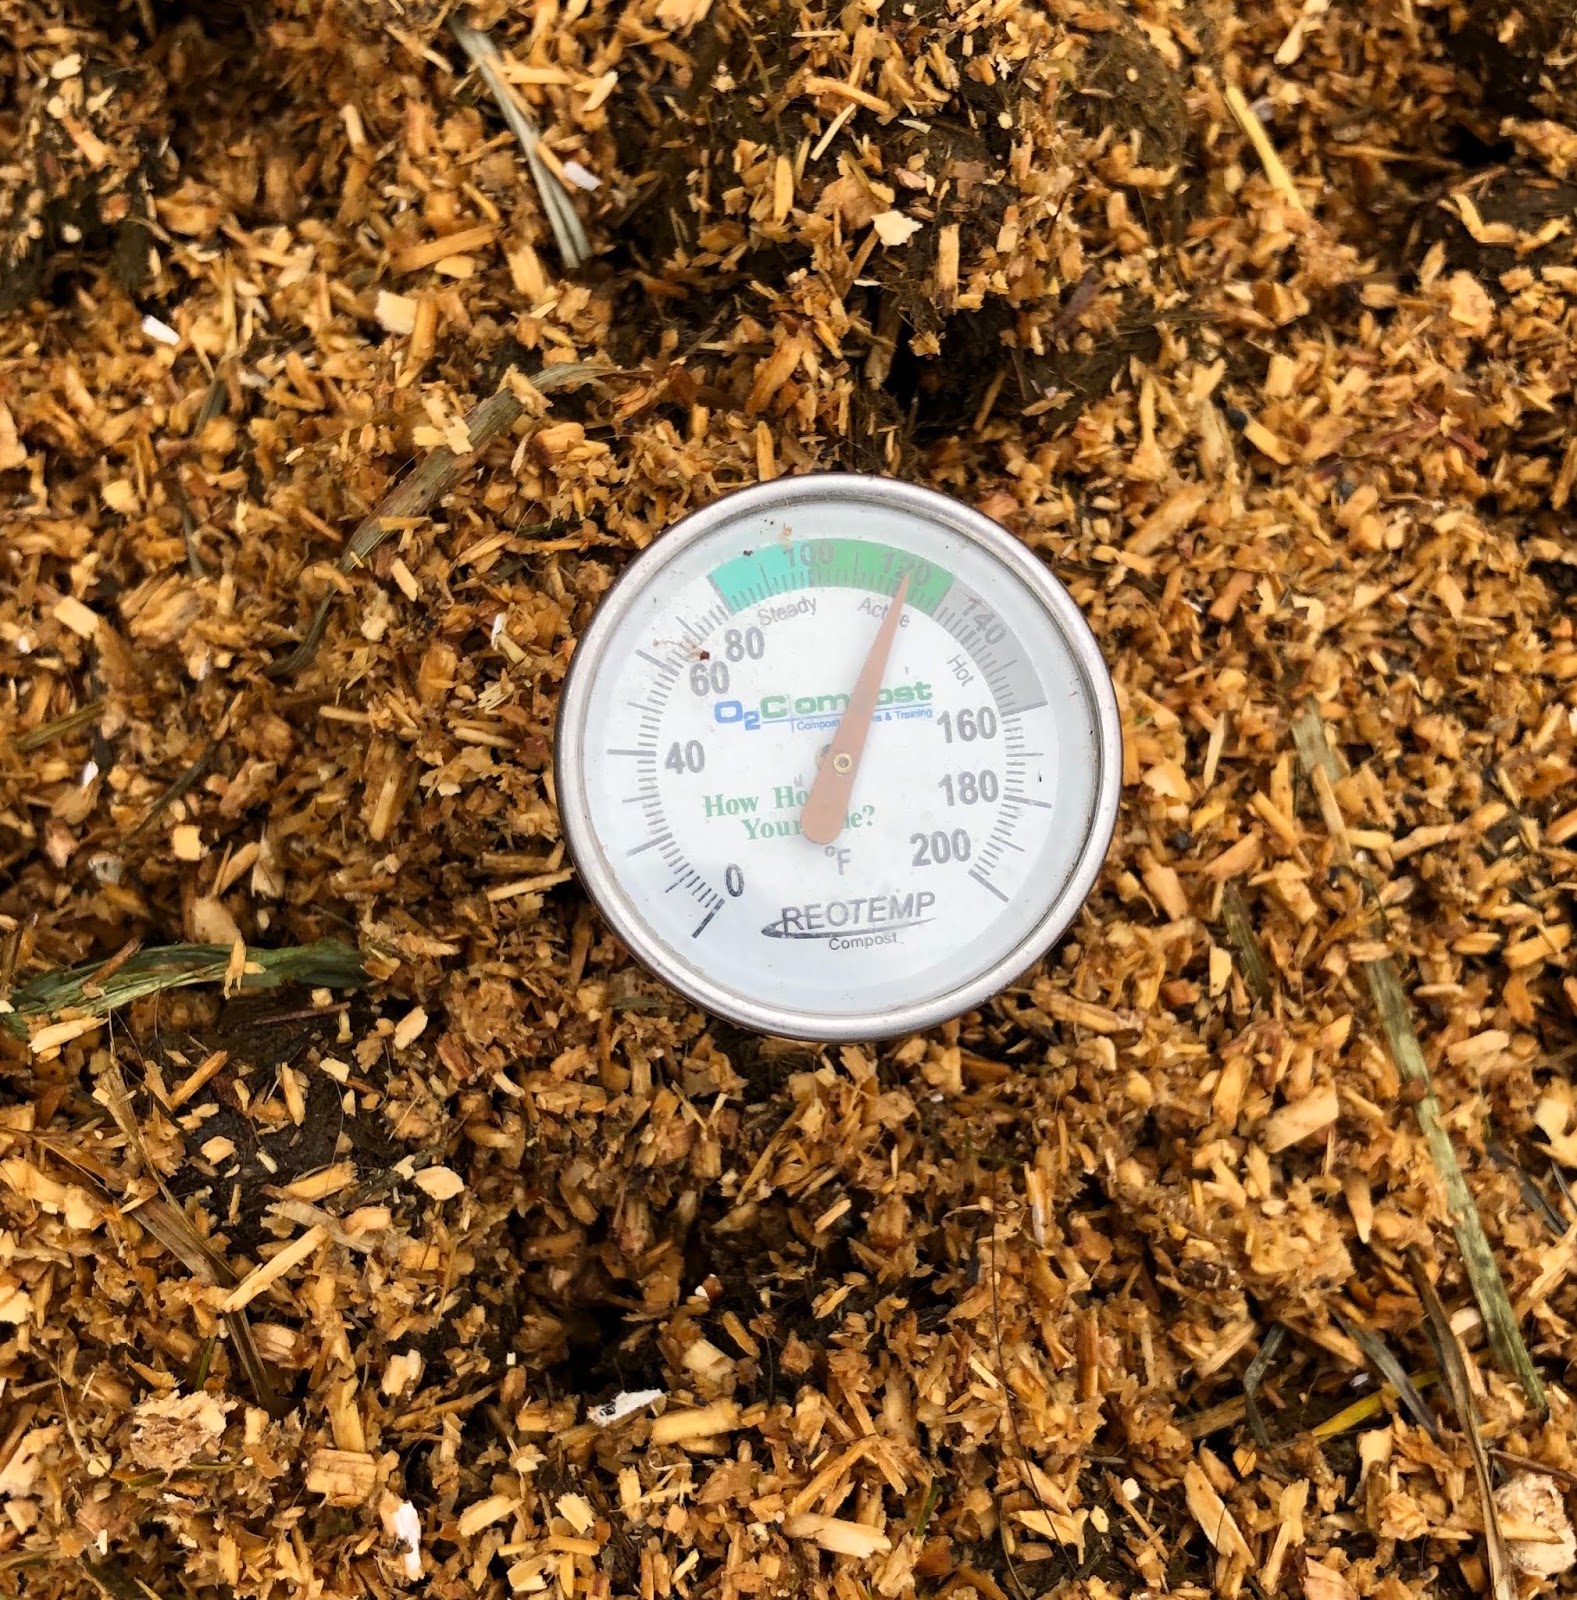
Meanwhile, it turns out that my stall pickings (manure plus bagged sawdust bedding) have the perfect composition to naturally fall in or just above the "active" temperature range as they are added to the bin. I might be wrong but my interpretation is that just by being piled up for a few days my stall waste is getting hot enough to kill pathogens and weed seeds, which for me is the main goal since apparently it's never going to cure enough to be nice finished compost anyway.

Yesterday's stall waste, already in the active range with no human intervention.
So then why am I shoveling all that waste into the bins only to shovel it all back out later? Over my six years of horsekeeping, my husband has developed a good-natured hatred of helping me undo things that have already been done. Example: we use T-posts and electric tape to subdivide the dry lot when I have an extra horse that can't get turned out with the others, and when that horse leaves in a year we remove the T-posts and electric tape. Another example: he builds a lovely stall divider for my mini-donkey, which he helps me remove when the new horse arrives because it needs the stall, then helps me replace when the new horse leaves so the donkey can have his stall back. Even though I think it's normal for my needs to change or for me to experiment with things then realize they don't work, I understand his objection to the Sisyphean nature of some tasks with which he kindly assists me. Helping me shovel horse poo out of the compost bins only to watch the "ungrateful horses" (his words, only partially joking and actually quite accurate) immediately fill them up again seems to fit in this category.

My husband rolling a giant ball of horse manure up a mountain for all eternity.
So all of this makes me wonder, what if instead of dumping wheelbarrows full of stall waste into compost bins only to move them to the manure spreader rather laboriously a few weeks later, looking much the same, I just dumped stall waste straight into the manure spreader? It would save quite a lot of time and effort, and my husband could absent himself from the farm's "waste management system" entirely, for which I'm sure he would be quite grateful. He's a good sport about it but in three years of helping me empty compost bins he has developed a strong distaste for horse manure, which didn't bother him at all pre-compost.

If the waste is getting hot enough all by itself to kill weed seeds and pathogens and it isn't curing long enough to be true compost anyway, what would I be losing if I mucked directly into the spreader and spread the waste on the pastures just a few weeks sooner, without aeration?

Direct spreading is a common practice, including amongst my neighbors. Ohio State's Agricultural Extension has a great fact sheet about it that you can find here. The takeaway is that although horse manure can be beneficial fertilizer, the sawdust or wood shavings in stall waste stunt crop/grass growth by inducing a nitrogen deficiency. To avoid this, you can add a small amount of nitrogen fertilizer to each wheelbarrow of waste. This seems so much simpler to me than my current system that I decided to try it.

Some of the constraints that might stop some farms from direct spreading don't affect me. It's environmentally unsound and in some places illegal to spread manure in the winter, but my horses are not stalled at all in the winter anyway so there's no stall waste to worry about. In some areas the ground can be too muddy or boggy for weeks on end to spread without tearing up your fields, but the majority of my pasture drains so well and has so much grass that I wouldn't worry about that.

So recently, after we emptied one bin, I removed the aeration pipes and backed the spreader into the bin, where it fit quite perfectly thank you very much. The lids even cover most of the spreader bed.

For some crazy reason the spreader hiding in the bin makes me think of a clownfish hiding in anemone.
I then had to rig a temporary ramp to allow dumping. A funny thing happened when I did some googling to come up with ideas of how to build the ramp...I found a Google Image from my own blog! I feel so famous!

That photo in the center looks familiar!
My husband had a stroke of genius, which was to repurpose a heavily constructed wooden gate that was just lying around unused (Reason #324 why I never throw anything away!). I cut it a bit shorter, attached the hinges to the back of the compost bin, added a 2"x2" to stop the wheelbarrow from rolling all the way in with me right behind it, and--voila, ramp!


When the ramp was done I bought 50 lbs of 21-0-0 ammonium sulfate for $13 and started my direct spreading trial. My two horses are in the barn full-time now due to an injury so it only took a week to fill the spreader to the point where stuff was starting to tumble off the sides when dumped in, which isn't as full as I can get it with the loader. At first temperatures were not in the active range, but as the spreader filled up I was pleased to see temps rise to 140+, high enough to kill weed seeds and parasites. I'm under no delusion that it all reaches that temperature, but neither does the manure in the pasture so I guess it's okay. When it was full I hooked the spreader up to the tractor, drove it out to a resting pasture, and in 10 minutes I had an empty spreader. Soooo much easier than emptying a compost bin!

So far I am thrilled with the labor/time savings, but I haven't totally decided to transition from composting to direct spreading for three reasons:

1) I worry that storing stuff in my spreader full-time would damage the bed. My spreader still looks pretty new because I spray it out scrupulously after every use. My neighbor told me that she's been mucking into a spreader for 30 years and has only had to replace it once though.

2) I would want to cover the spreader to maybe cut down on flies and keep the waste from getting too wet to stay hot long enough. I hate tarps so I would want to build a nice cover for it and that would be another time and money sink. I'm wondering if I could repurpose the compost bin lids though.

3) If I quit composting I would feel like I wasted the almost-$2,000 that I spent on the O2 Compost system and the materials for my bins. $2,000 divided by 36 months would mean that I spent $56 per month on my system, which is more than I was paying for manure removal previously. Perhaps I could recoup some of the costs by selling the pump, pipes, and disassembled bins, but I'm not sure how big a market there is for used "poop boxes" (probably not how I would advertise it on Craigslist!). Or to shift the balance I could factor in the value of my and my husband's bin-emptying labor, but when you have a hobby farm that's really not something you should get in the habit of doing or you might cry.

Since I'm trying to give my readers a complete picture of how aerated compost has worked for me, I thought I should share that I'm thinking about quitting it. To aid in my decision process, I welcome any comments about direct spreading!