Friday, January 17, 2020

Winter Hay Feeding: Round Bales vs. Small Square Bales

I've found sourcing good hay to be one of the most difficult and stressful parts of horse ownership. I'm lucky to be in an area with many options, and I still struggle. I try to choose what I think looks good (nice smell, no apparent dust/mold, no apparent weeds/trash, not too stemmy) but my horses can turn their noses up at stuff that looks and smells perfectly fine to me, even in winter when they have little else to eat. So, I like to pick up a few sample bales to feed before I commit to a whole load. That doesn't work 100% but it's better than relying on my own senses.

4ffc3a_32d72e9fa0434b86b89083d3385ce66b-mv2
Turns out it's not always this easy...
Last year for the first time I tried feeding large bales (round bales or large 3'x3'x8' square bales) in the winter, and it's been a really mixed experience. First of all, round bales or large squares (I'll just use "round bales" as shorthand for the rest of this post) present some logistical problems for the small farm. They're big (duh!) and hard to move. I typically buy one at a time, bring it home in the bed of the pickup truck, and roll it off the truck to wherever I want it. I can even get a whole-bale hay net on there by myself in the process. But, I can't flip the bale onto its end or move it onto the pallet I put underneath to try to keep it dry, so hubby has to help with that part. I also bought a secondhand bale spear for my 23-horsepower Kubota, which works well if I need to store one in the garage for a little while before feeding it. Obviously without a large tractor and specialized machinery, I can't stack them, so if I bought more than one at a time they'd take up a lot of floor space.

The major pros of round bales are the daily labor savings and the cost. It's so much easier to put out a round bale every few weeks than it is to dole out square bales daily, whether I'm putting them in hanging hay nets or hay boxes or just throwing them into the Hay Hut (the easiest option for square bales by far, though the horses do pull some of it out onto the ground).

My first winter, hubby and I built this 4x4 Slow Grazer box. I used to fill this with about 1.5 bales every evening for the two horses and mini-donkey. It's a nice design but honestly a pain to fill. You can't just throw two bales in there because the horses can't eat it well through the grate unless the flakes are separated and fluffed a bit. P.S. Most donkeys, especially minis, should not have unrestricted access to hay for health/weight reasons.
I also used to hang hay in nets on the fence in the dry lot. Here Dominick the Donkey demonstrates that a little no-climb wire can't keep him from food!

If the weather is cold/wet enough, I hang a few nets in the run-in shed. Here are Z and Mr. F sharing nicely (not for long, I'm sure). I always hang one more net than there are horses, and spread them out so no one has to fight for hay.
With a round bale, I also get some peace of mind knowing that the horses always have plenty to eat, even if I'm working late. In the rare event that I go out of town, someone else can care for them with minimal labor.

I have also definitely saved some money feeding round bales. Here were my average hay costs per horse per month from December to February by year (the horse count doesn't include the mini-donkey because he eats relatively little and has been a constant--sorry Dominick!):

2014-2015: $101/horse/month (small squares...I don't think I fed the best hay this first year, out of ignorance, which is part of why costs were so low)
2015-2016: $156/horse/month (small squares)
2016-2017: $157/horse/month (small squares)
2017-2018: $152/horse/month (small squares)
2018-2019: $94/horse/mo (round bales supplemented with 4-12 small squares per month)
Dec 2019: $59/horse/mo (round bales supplemented with 6 small squares)

The cost savings look great, but unfortunately some of my horses haven't maintained weight well on round bales and a lot of each bale goes to waste. They're just not that enthusiastic about them and they seem willing to starve themselves to some extent. Some people say, "If they get hungry enough they'll eat them," but I'm not willing to let my horses lose weight and condition just to save myself some work and money.

One of my Thoroughbreds four days before I put out the first roundbale of the season.

The same horse, noticeably thinner after being on a roundbale for a month. Interestingly, this weight loss was despite dramatically increasing his grain from ration balancer plus 2 lbs/day of rice bran to 7 lbs/day of Triple Crown Senior. It wasn't a very cold month either. And he was out of work for a couple weeks so he should have needed fewer calories!
Update 1/24: After less than 2 weeks back on square bales, the Thoroughbred's ribs are already less visible. His workload and grain ration stayed the same.
In my case, none of this lack of enthusiasm is due to the horses wasting the round bale or it being exposed to the weather. I use a Hay Chix round bale net to keep horses from pulling the hay out to use as a bed or toilet, and a Hay Hut to protect it from the elements. (Side note: if you just have to pick one, I think the Hay Hut does more than the net. Also, although it's quite expensive it's much more durable than a net. Mine had some quality control issues like holes not lining up, so I think it was a bit overpriced, but it has done its job. If you're lucky you might be able to find one used at a significant discount. Also, if you have horses with shoes it's not safe to put a round bale in a net without something to keep them from stepping in/on it. I did this for literally 24 hours once when I was in a bind, and I witnessed one of my horses getting tangled and panicking.)

I think the waste and weight loss are caused by a combination of two factors:

1) Horses seem to believe that hay has an "expiration date" once set out, even if it's protected from the weather. If you have more horses they will eat the round bale fast enough that it doesn't reach the expiration date (and hopefully some are on the less picky end of the spectrum and willing to clean up what the princes and princesses won't touch). With only two to three horses, I've found that a lot of each bale gets left behind and goes to waste.

2) Round bale palatability, in my experience, is lower than square bales. They seem to eat 80-100% of most square bales but only about 60% of round bales. (Some of the ~40% they don't eat has probably reached its "expiration date" but I also think some of it was unpalatable to begin with. Even from the beginning of a new bale there are mouthfuls that they will taste then let fall out of their mouths, or move out of the way to get to the choicer parts.)

Usually after two weeks it's hard to tell if the hay level is going down at all. I untie the hay net so they can pick through it more easily, but that hasn't done the trick. The longest I've left one out was a month, and at that point they weren't eating it at all. After two weeks or so I'm typically wondering if they're eating enough and worrying about them losing weight. My horses will eat about 30 lbs/day each of square bales, so a 600-lb round bale should only last about 10 days with 2 horses if they're eating at the same rate. The fact that a round bale lasts me weeks and weeks means that a) they're just not that into it and b) they're not getting the nutrition they need.

After 3 weeks, there is still a LOT of this second cutting orchard grass round bale left! I untied the net to let them pick through it more easily in the hopes that they'd eat more, but they still never finished it.
Part of the problem might also be that it's harder to evaluate quality before you buy. Unlike with small square bales, you can't grab one to try or break it open to see how it looks inside. I recently ended up with a round bale that my horses would barely pick at, and there was no good way to get rid of it. If you place your round bales out in pastures it's not a big deal to just leave it out there to rot and move on to the next one, but I put mine in the dry lot so leaving it there would ruin the expensive stonedust footing. Having to deal with a massive pile of uneaten hay every few weeks partially offsets the time/labor savings that make round bales attractive in the first place.

Giant pile of uneaten hay that needs to be moved before I can place the new bale (which, by the way, is easier to unload if it's turned 90 degrees so you can roll it off the tailgate). 

I ended up dragging the pile of hay out to the field to decompose, which is probably more stress than I should put on my round bale net regularly.
I'm perfectly willing to consider that I'm buying sub-par round bales, but I've gotten them from a very reputable supplier that I've bought square bales from for a couple of years. I've tried to find other sources but so far the strongest endorsements I've gotten from any friends are "okay but we've gotten some bad ones" and "my horses ate one but not the other"--not exactly confidence-inspiring. I also wanted to try putting out only half of a 3'x3'x8' at a time, but I haven't been able to find any of those this year (and the one I tried last year was not well-liked by my horses anyway). For at least the rest of this winter I'll be going back to small square bales thrown into the Hay Hut daily, for my peace of mind and the horses' health.

Thursday, January 9, 2020

If One Donkey Is Good, Two Are Better!

Dominick the Donkey has been part of my herd pretty much since I brought my horses home, in August 2014. I found him on Craigslist and brought him home from an unsanitary horse dealer's lot where he was living in a large concrete pen with a couple dozen other equines, picking straw and hay out of muck piles. :-( Amazingly, despite coming from a bad setting, he had obviously been well cared for in the past because he was in good weight and had healthy, well-managed feet.

For 5.5 years, Dominick has enjoyed being one of the gang with the horses. Unfortunately, horses and donkeys (especially miniatures like Dom) have very different nutritional requirements. My large, hard-working horses do best with free-choice forage, whereas Dom needs his intake limited. In the summer this is easy because the gang comes into the barn for the day to avoid the heat and bugs, where each stall/run is stocked with the right amount of hay for its occupant (full hay nets for the horses, and a single flake for Dom). Overnight while they're turned out on grass, Dom wears a grazing muzzle.

Winter has been a bigger challenge because full-time turnout with unlimited hay is easiest for me and healthiest for them, but makes it difficult to manage Dom's weight. He tolerates a muzzle 24/7 but I hate that he doesn't get a break from it, and even with the muzzle he tends to come out of winter fatter than he went in. I can't separate him from his horse friends to give him a break from the muzzle either because he will freak out alone, even if they're still in sight.

So, I finally decided to cave and acquire a buddy for Dom, so that he can be dry-lotted with a friend and appropriate forage while the horses are turned out 24/7. Which leads me to...

Welcome home, Lancelot!!!!

Mr. F says, "Mom, I don't know if you realize but there's a small gray thing in my stall..."
Lance came from a wonderful Maryland rescue, Lost and Found Horse Rescue, which despite its name rescues primarily donkeys. He is about two years old and was born to a feral herd, so although Ashley at LFHR has done a terrific job getting him healthy, he is still very timid around people and easily frightened. Thankfully he is also highly food-motivated so every evening I hold a bucket with some Triple Crown Senior and while he eats I scratch and groom him. We're also working on giving to pressure and leading properly, because right now leading involves me luring him from one place to another with a bucket of grain. Thank goodness he loves his food!

After only a couple of days together, Dom and Lance are sharing a stall and a hay net. I think they will be inseparable before long! I also think Dom will be a good influence as Lance is already getting braver around me while he watches Dom approach fearlessly for treats and attention. I love that Dom will have a friend his size to play with because he clearly enjoyed playing with my yearling a few years back, but hasn't had anyone who will play with him since.


What I've learned from this is that although donkeys are wonderful, they are not ideal companions for horses unless you can limit grass/hay or separate them at least part of the time. When I first got Dom I was stalling my horses during the day in summer and overnight in winter, which worked well for him, but as my horse management practices have evolved I've had to adjust my donkey management too. I hope that having a buddy brings Dom joy and helps keep him healthy for years to come.

Saturday, September 14, 2019

Cleaning Saddle Pads

Confession: I suck at keeping horse gear clean. At shows I tend to hope that most people will be focused on their own business, and any dirt or stains noticed in the show ring will be attributed to the warm-up. I always manage to bump against some dirty, greasy part of the truck or trailer while wearing my white breeches. I tend to just buy cheap white show pads and breeches so I don't feel so bad when I ruin them.

But as a generally neat and tidy person, I don't want to be that slob. So, I've recently been experimenting with some different methods of cleaning saddle pads and here's what I've learned.

An ounce of prevention is worth a pound of cure
Okay, this one thing makes a huge difference! After each hot summer ride, turn the hose on full-blast, hang the saddle pad upside down on a fence, and spray the dirt and sweat off the underside of the pad before it dries and hardens. I also use a Strip Hair groomer to flick off the hair. Leave the pad out to dry in the sun. It should be soft and relatively clean in a few hours. If you add this to your daily routine, your pads will stay cleaner and go longer between real washes.

For a deep clean, try a pressure washer
If you have a farm, odds are you have a pressure washer. If not, you should! They're incredibly useful for cleaning pretty much everything...trailers, buildings, concrete floors, horse brushes, you name it. (Not the horses though!) I recently broke mine out and sprayed off all my saddle pads with just water. For some of the pads, I found the results almost miraculous.

Look at this Euro Eventer pad! I washed half of the underside and was so amazed at the results that obviously I had to take a picture. The crazy thing is that I don't use this pad often at all, so the dirt was old and well set. It had also already been washed in the machine. This is not fresh dirt coming off. Amazing!


I tried both the 40-degree and 25-degree nozzles. The 25-degree one was probably a little much and I did notice damage to some of the cheaper pads afterwards. If you go this route, be careful, start with lower pressure, and test it on your older or less-expensive pads first.

I soaked a few pads in Oxy Clean for a couple of hours before pressure washing and didn't really notice a difference between those pads and the others.

For tough stains, try Fels Naptha soap
You know those dark boot stains right behind the girth? Try pre-treating them with a bar of Fels Naptha soap. The old boot stains I treated with it didn't come out completely, but I was surprised how much things improved. I can't wait to try it on a fresher stain!
Boot stain before Fels Naptha soap

Same boot stain after Fels Naptha soap
One pad from beginning to end

Show pad before cleaning

Show pad after soaking in Oxy Clean and pressure washing with just water

Show pad after pressure washing, spot treating with Fels Naptha soap, and machine washing on the deep clean cycle with bleach and hot water. It's not perfect but it's definitely a lot more presentable. If I had washed this right after use I think the results would have been much better.

I don't feel like I've mastered this because that white show pad is still not sparkling clean. How do people do that? Other things I'd like to try are spraying new pads with Scotch Guard before use and washing show pads immediately after the show (duh).

Tuesday, January 29, 2019

My Resident Foxes :-)

Disclaimer: this post has nothing to do with farm management!

We have always had occasional fox sightings on the farm, including a wonderful morning of watching a momma fox pounce on mole after mole in the pasture and take them back to her den. This winter, for the first time, two foxes have been hanging around regularly enough that I see them several times a week. I've seen the horses watch them race through the pasture. I've seen them flee from the dry lot when I go out to feed the horses. I've surprised them in my barn aisle a few times coming back from a ride. One even jumped out of the Hay Hut as I approached one cold, rainy day! (I've also found bunny halves in my manure pile, but I can live with that.)

A couple of days ago I walked out to the barn to tack up for a ride and saw a furry red blob in the trees behind the barn. I ran back inside for my camera and crept up again, snapping some pics before going out to the pasture to catch the pony.


Unfortunately I scared him/her away walking out to the pasture, but once there I couldn't believe my eyes...the second fox was also curled up in an adorable red ball, in the pasture with the horses! I felt pretty guilty disturbing their nap time (the pony was lying down too!) but I had a jumping lesson to get to.


They quickly found the cat food in the barn aisle, which led to some evening sightings until I wised up and started putting the cat food away at night.

Basil waits patiently for me to leave the barn so he can eat cat food.
Not realizing I'm in the barn, Basil sneaks in for a snack.

I really love seeing them and hope they stick around. I have no idea if they are a mated pair but I do hope there are cubs in the spring!

End of summer update 9/14: No cubs. :-( I saw our resident fox, Basil, every single day all spring and early summer but then one day he disappeared. I didn't see him at all for 4-6 weeks and was pretty worried he had gotten hit by a car. Then one day he was back in his usual spot by the stream! Then gone again. I know he comes around at night (we have a trail cam) but we don't see him regularly anymore. Maybe next year!

Tuesday, January 15, 2019

Snow Days


Snow is beautiful but it certainly creates some challenges for horsekeeping! I consider myself lucky that here in the Mid-Atlantic we usually only get a handful of significant snowfalls each winter. Although that does mean that rather than sticking to a set routine, I get to agonize anew every time over how to manage the horses and handle the aftermath!

Although I started out keeping my horses in during the day in summer and in during the night in winter, with the construction of my dry lot I can now stall my horses as little as possible without them demolishing the pasture. So the past couple of winters I've avoided stalling almost entirely by closing them in the dry lot overnight and opening the gate to one section of the pasture during the day. This has worked out really well, as it significantly reduces my chore time (especially in the cold, dark mornings before work, when all I have to do is open a gate) and allows the horses to be out moving around as much as possible. Knowing that they have a shed to retreat to in bad weather, I never have to worry about them. I love love love my dry lot! (See more on its construction here.) As well as being generally useful and wonderful, my dry lot gives me more turnout options during snowy weather. In this post I discuss the factors I consider when managing my horses during snow and cold weather.

Horse comfort: Some people tend to project their temperature preferences on their horses. "If I'm cold with a sweater and coat on, Dobbin needs a heavy blanket and a hood and to stay inside tonight!" Keep in mind that horses are designed to handle cold weather much better than humans. Their respiratory system, digestive system, insulating coats, and sheer muscle mass all enable them to be comfortable outside at temperatures that would leave most of us wanting to curl up in front of a cozy fireplace. They may even be warmer outside moving around than stuck in a small box in the barn. Keep in mind that if you do turn out in cold weather, it's very important that they have shelter from rain and wind as well as ample hay to fuel the internal furnace.

As far as blanketing, while I do own turnout sheets and medium-weight turnout blankets for each of my horses, I leave my unclipped horses naked unless they actually need clothes. As temperatures start to drop in the fall, I monitor their comfort every chilly morning. If they seem happy and comfortable, I let them stay au naturale. If they are running around to stay warm, huddling in the shelter, losing weight, or shivering, they need to be blanketed appropriately! (Too much blanketing is, in my opinion, worse than not enough because the horse can sweat and then become dangerously chilled.)

Mr. F may look cold with his frost-tipped mane, but he's happy, healthy, and in great weight. He hasn't worn a blanket in two years, since he retired and stopped needing to be clipped. He's turning 23 this year and I will continue to evaluate as his needs change with age.
On the other hand, I found my pony shivering this fall, even before I clipped her, and she now basically lives in a medium with a hood. Although she's half Welsh, she's also half Thoroughbred and tends to be a little more sensitive. She also needs to gain a few pounds so I don't want her shivering off any calories. Plus she has a bib clip now to reduce sweating during work. All of these things mean she needs clothes, and I'm happy to provide them!
Of course, the clipped ones are blanketed proactively because I've removed one of their main natural defenses against the cold. Just last week I purchased an off-track Thoroughbred that came up from Florida and is clipped to the bone, nose to toes. I happen to own a heavy turnout blanket in his size and he may be the first horse on my property to ever wear a heavy, if temperatures drop further. (Usually it doesn't get cold enough here for heavies for unclipped or partially clipped horses, though I might very rarely layer sheets and mediums if necessary. In fact, last night the weather surprised me by dropping to 12 degrees and he was still comfortable in his medium with a hood.)

This won't apply to those poor people who don't have a long-ear in their life 😉, but Dominick the Donkey also gets blanketed during winter precipitation because as a desert animal, his coat lacks the waterproofing oils of the horses. This leads to adorable morning scenes like the icicle donkey below:


Footing: A bigger risk in my mind than cold horses is horses running around on dangerous footing. Again, fresh snow is not usually a big deal, especially if it's a nice, powdery, dry snow. The horses love to play in it!

Nothing like fresh powdery snow to help show off that nice big trot...

...until you take a bad step and faceplant in a drift. Okay, he's not the most graceful horse in the world but he came out of it with no harm done.
Unfortunately here in the Mid-Atlantic our snow is more commonly the wet and heavy type that balls up in the horses' feet and then hardens into lumpy ice the next day. You also have to worry about the underlying dirt or footing being disturbed by hoofprints and then freezing into hard lumps, or thawing during the day to leave a layer of mud that's "slick as snot," as my farrier would say. I tend to shoe my horses with rim snow pads and turn out no matter what, but I fully understand why many people will keep their horses inside in this type of footing. A nice compacted stonedust dry lot does help, but even that will be pockmarked with hoofprints when it gets saturated with melting snow.

The sand-and-stonedust mixture in front of the shed is saturated from the melting snow, and by morning it will be frozen into hard lumps. I've already picked as much manure as I can but don't look too closely...it's not what I'd call clean! 
Water: I am extremely fortunate to have a heated Nelson waterer in the dry lot, so I really don't have to worry about this anymore. But if you don't have a heated waterer and it's cold enough to snow, obviously it's cold enough to freeze your water buckets or trough! If your area gets to the 30s or below in the winter, definitely try to run power out to your pastures so you can plug in trough defrosters or large heated buckets. It won't make the water warm, but at least it will keep it flowing and the horses hydrated! I used to use this 16-gallon bucket from Allied Precision, which was the perfect size for two large horses and a mini-donkey to use for 8 hours a day. I preferred it to a large trough because it would be close enough to empty by the end of the day that I could easily dump it, unplug it for the night, and start over with fresh water in the morning.


Cleanup: I pick manure from the dry lot daily to prevent it from mixing into the stonedust footing and ruining my expensive investment, and picking manure from snow is THE WORST! So when there's significant snow, I sometimes do keep the horses inside overnight just because stall cleaning is a million times easier than the old poop-ball-in-the-snow treasure hunt. And as bad as that is with fresh snow, just wait until the snow partially melts then refreezes, encapsulating the manure in a shell of icy sludge and cementing it to the ground! At that point, you need a metal pitchfork and sometimes a sledgehammer to chisel it out. Once the snow melts, I have to do some tedious extra cleanup to prevent the now-soggy manure bits from mixing into the footing.

What's the only thing that can make cleaning manure in the snow more difficult and annoying? A stubborn ass standing between the manure and the muck tub!

This is as clean as it's going to get for a while.

Tuesday, July 3, 2018

Short-Term Hay Storage Shed Design

One of the things I've noticed about farm life is that every solution comes with new problems. That's the pessimistic way to put it I guess! What I mean is that whenever I make an improvement that I think will make my life easier or my horses' lives better, it inevitably comes with new, smaller issues that need to be resolved. For example, when I started rotating my pasture I found that although it was very good for pasture health, no horse traffic in an area for weeks at a time encourages wildlife to move in, so I find myself filling rabbit holes more often. (No groundhogs yet, fingers crossed.)

Here's another example, and the topic of this post: I installed a dry lot to save the pasture in bad weather, get the horses out of their stalls, and save myself labor as far as turn in/out and stall cleaning--and now I've found that there are more things I need to do to make that work. Specifically, I need somewhere to store hay near the dry lot.

Building hay storage into the shed wasn't very practical because of how the shed is sited (on the far side of the dry lot, abutting the field). Last winter I stored hay for turnout on a pallet covered in tarp, but that system doesn't work well in warmer weather when the hay is more likely to get moldy. I decided to put a 4'x8' shed with double front doors near the main gate to the dry lot. That should leave room for a couple pallets of hay (my goal is to keep a week's worth), a couple bars for hanging spare (dry) blankets, and a few hooks for miscellaneous things like feed bags.

I'm fairly handy and have a lot of tools, so I thought building it myself might be an option. I found these instructions that seemed pretty straightforward. To estimate cost, I added all of the materials I would need to a Home Depot shopping cart, which quickly reached almost $600, not even including the roof and doors! I decided that once I factored in those things and the opportunity cost of my time (and inevitable frustration as something didn't go as planned), maybe the DIY option wasn't worthwhile after all.

I spent a day shopping around online with little success. Many lower-cost options are metal, which I don't want for hay storage due to lack of breathability, and many wooden ones were too big (starting at 8'x8'). Finally I emailed a local place where a friend had bought a very large and extravagant shed a few months back. I was in luck! They had a 4'x8' lean-to style shed with the exact configuration I wanted, and it was even painted green with off-white trim, to complement (or at least not clash too badly with) my light-green-with-white-trim run-in. Including tax and delivery, it would cost $1,090. As much as I didn't want to spend that, it was only a few hundred dollars more than the DIY idea would cost, and I wouldn't have to kill an entire weekend building the thing.

Over the weekend, I chose a level site near the gate and prepped it by stripping the topsoil with the tractor. This was much easier than I expected, as my tractor is only 23 HP. Apparently the ground was just the right amount of soft for the job, without being wet or mucky. I tidied up the edges a bit with the shovel and retired to the house rather proud of my hour's work!

Dominick the Donkey provided expert supervision during site prep.

The hole ended up being 18" longer and wider than the shed, which is what the internet recommends (so it must be true, right?). It was about 6-7" deep. I was aiming for 12" wider and 4" deep but my tractor skills aren't all that refined.

The next day, the local landscape supply store delivered a load of CR-6. I was originally planning on ordering 1 ton but since I got a little overzealous with the tractor, I decided 2 would be safer. It was about $30 per ton plus a $30 delivery fee, so around $90 total.


After the stone was delivered, I spread it around in the hole with the tractor bucket, then leveled it roughly. I wet it down to aid in compaction, topped it off with a bucketful of stonedust from my stockpile (handy stuff!), then drove back and forth many times, checking level once in a while. I think a plate compactor is recommended but this shed is relatively small and has its own 4x4 base and skids, so I was a little casual about it.


The newly delivered shed sits well on the little base I made it:


Inside I have two pallets for hay, hooks, a blanket rack, and some miscellaneous stuff I like to keep out near the field:


The light just under the eaves is a battery-powered motion sensor light I screwed into the wall so I can see what I'm doing in there. I have a few more of those lights scattered around the farm, like near the gate to the pasture, and they come in handy.
Since hay was what I'd be using from the shed most often, I positioned it so I could access it without having to open both doors. There's actually a second stack of hay to the right too, so I can fit 6 bales easily and 8 if I want to stack to the ceiling.

I was sure when I first wrote this post 1.5 years ago (whoops!) that a family of coyotes or something would move into it and cause yet another problem for me to solve, but so far this shed has been problem-free! It has even withstood some really high winds, despite the fact that I never got around to anchoring it like maybe I should.

Friday, June 29, 2018

PVC Strip Doors for Stalls

I love that my horses can go in and out of their stalls at will, but one problem with having the Dutch doors open all the time is that rain and snow sometimes blow in. If I had shelled out for a real overhang on that side of the barn (major regret!), that might not be a problem. But the overhang is only a few inches and adding one now would be a huge, expensive project so I looked for an alternative and found out about PVC strip doors. You may have seen them in warehouses or walk-in freezers.

Purchase and Installation

I purchased "PVC stip doors" from Hoover Fence. It cost $145.53 for the mounting hardware and enough strips to cover each 4' wide doorway. The strips have little holes at the top that you use to hang them from the mounting bracket. It only takes a step stool and a few minutes to put them on or take them off. When you first get them, you trim them to fit the height of your doorway (a pair of sharp scissors works just fine, no need to mess with utility knives). I made sure to cut mine just short enough that a horse couldn't step on a trailing end and rip the whole thing down. You should install them so that they overlap each other a little bit.

Acclimation

Since my horses had never experienced strip doors before, I acclimated them to the strips slowly. I added once to each side first so their barrels would just brush against the strips. I led them in and out of their stalls a few times to make sure no one was going to freak out. After a few days I increased it to two on each side and then three. That left only a small gap in the middle that they could stick their noses through (as you can see in the first picture below). After a few more days I added the final strip so that they had to actively part the strips with their noses. My horses never showed any anxiety about the strips, even the very-cautious donkey who took months to decide the Bar Bar A waterer was safe to use, and I probably could have put them all up in just a day or two if I had wanted.

R sticks his head through the gap in the strips that I've left to acclimate him to walking through him.

Even the donkey, who is super cautious about new things, figured out the strips pretty quickly. (Pardon the poo, but that nose was too cute to not photograph!)
Rain-proofing

You can see in the photos below how the strips reduce the amount of rain blown into the bedding (this photo isn't super-dramatic but there's definitely a difference, I swear. If it's super windy and the rain is blowing sideways from east to west (my stalls face east), some rain might come in, but nowhere near as much as when the strips aren't there.

You can kind of see the darker bedding that got wet when the rain blew in.

With the strips installed, the bedding is totally dry.
Insulation

One benefit I hadn't given much thought to was keeping the stalls a little warmer in the winter. Horses handle cold very well and my part of the country (the mid-Atlantic area) doesn't get cold enough to be a problem, but frozen water buckets and things like that are a pain. I was pleasantly surprised to find that the strips make a significant difference in the amount of ice in stall water buckets after a cold night.

I removed some of the strips from one stall as an experiment. The bucket on the left came from a stall only half-enclosed with PVC strips. The bucket on the right came from one fully enclosed. You can see a big difference in the amount of ice in the buckets.
Bird-proofing

I have had issues with undesirable birds like starlings trying to nest in my barn every spring, so it occurred to me that the strips might help with this too. My aisle and aisle windows are not screened off in any way, so birds can still get into the barn and I have seen them fly around the stalls looking for a way out, unable to get through the strips. If you have a major bird problem and want to enclose all of your doors and windows, PVC strips could be part of that plan.

A few times I have seen undesirables like horseflies and wasps trapped inside the stalls though, and unlike birds they're not generally smart enough to seek another way out, so that's one thing to consider.

Summer

The first full year I had the strips, I found that they were not advantageous in the warmer months. Not only do they occasionally trap unpleasant insects inside the stalls, but they also block the breeze. So, I typically put them up in the fall and take them down in early summer, when I start to feel like they're making the stalls stuffy. I do wish I had them up sometimes during summer thunderstorm season, especially when the rain blows sideways and soaks a large portion of the stall!

Cleaning and Storage

The strips do get grungy over time from the horses walking in and out (especially if you have a dusty donkey--it cracks me up to see the strips for his door totally clean at the top and filthy at the bottom 3 feet). Also, if you take them down for part of the year you'll want to clean them before you put them away.

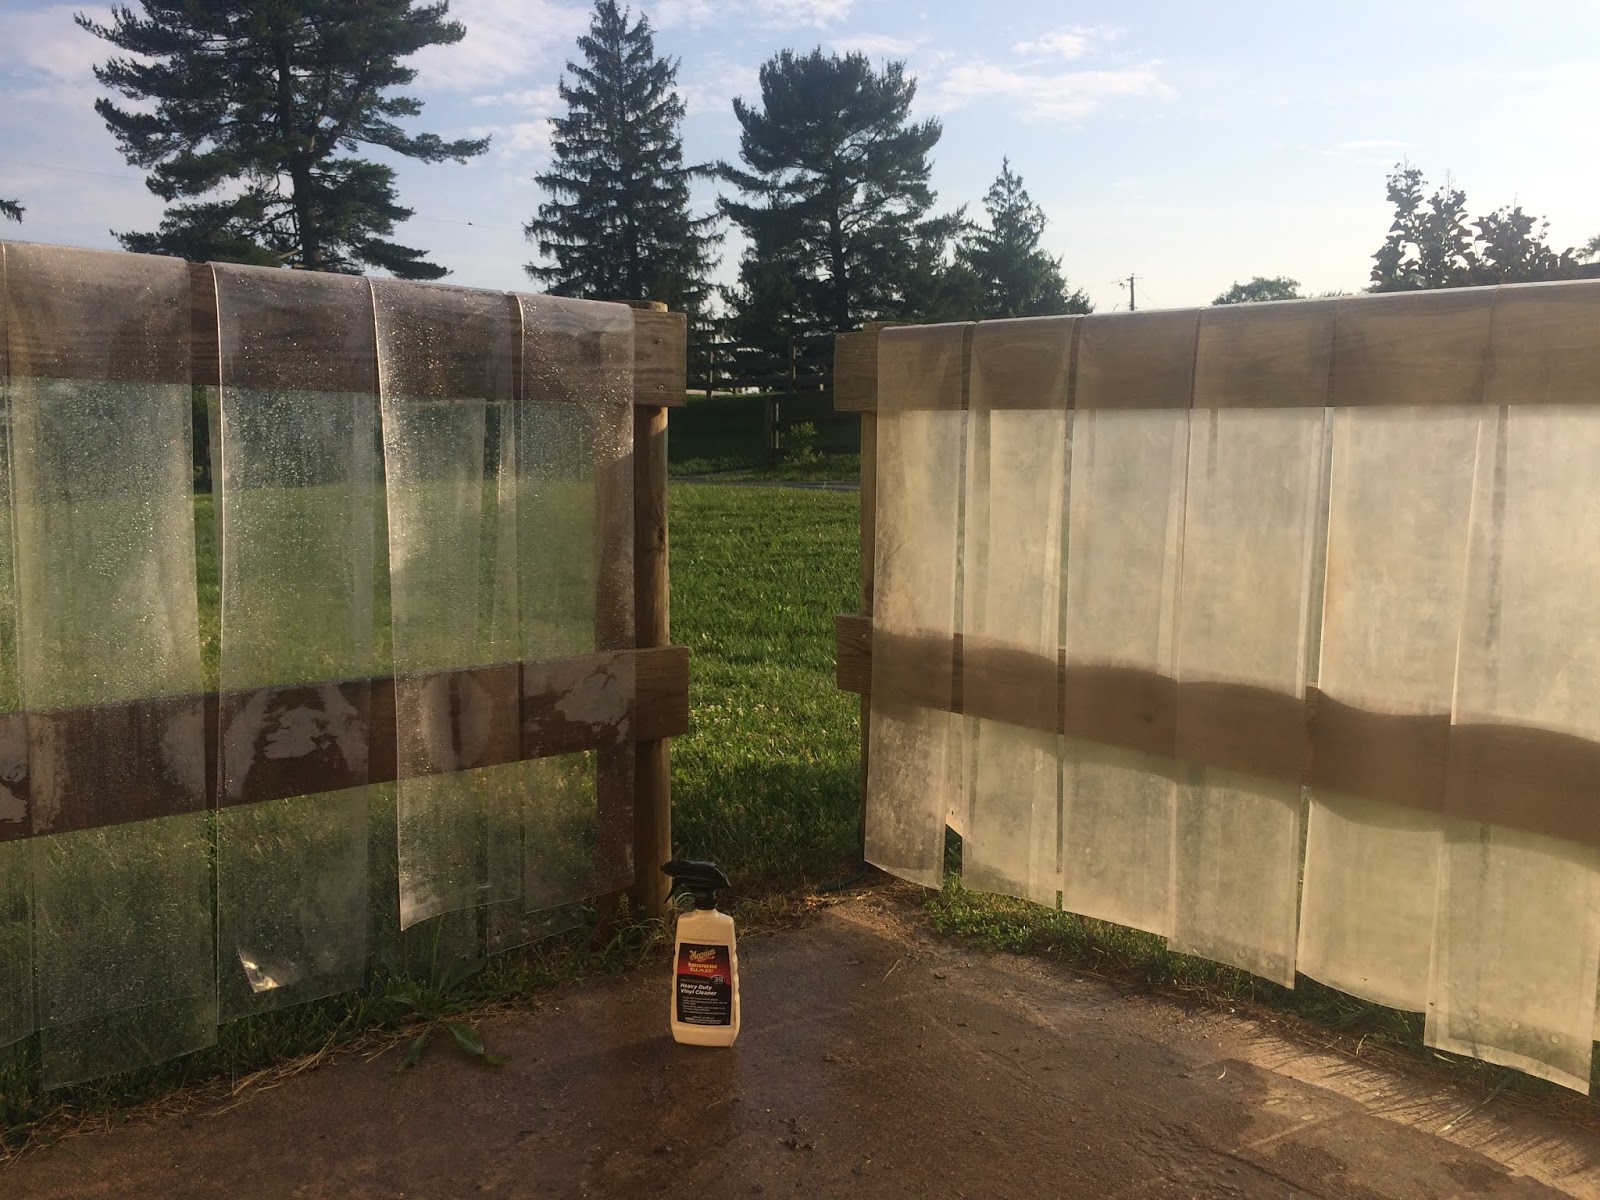
The good news is that cleaning them is easy. Because I make all my purchase decisions based on Amazon reviews 😇, I bought a bottle of Meguiar's vinyl cleaner. I drape the strips over the fence of my wash rack, wet them down with the hose, don some rubber gloves, and turn the strips transparent again. One spritz of Meguiar's goes a long way, and it allows you to easily wipe off most of the grunge. I think one bottle will last quite a few years.

Hopefully I don't need to tell you which side is before and which is after!

You don't want to fold the strips up for storage because they will develop creases where they're bent. Once mine have dried in the sun, I roll them up and put them in a box in the garage until fall. (Note: a box containing strips for three stalls is surprisingly heavy!) I try to hang them up again before winter sets in because if it's too cold, the ends of the strips tend to stay curled.

Sunday, June 24, 2018

Aerated Compost: Is It Right For You?

Dear readers,

I realize it's been a long time since I've posted! A few people have requested a new post or a post specifically on this topic and I feel remiss for keeping you waiting so long. (I love reader feedback, by the way!) I've been writing this post little by little over time, wanting to get a feel for the compost system before I passed judgment. Without further ado...

It has been about a year since I built my bins and started using an aerated compost system designed by O2 Compost. Now that I have some familiarity with the system, below are the pros and cons to aerated compost as I see them (I'll elaborate more on the cons because the pros are pretty much what O2 Compost advertises, and I already discussed them a bit in this post).

Disclaimer: I am by no means a composting expert. The following is based on my experiences over the last year and on my understanding of the O2 Compost materials and discussions I had with them before and after purchasing my kit. If any of you readers have additional or contrary thoughts, please share them with us in the comments section!

Pros
  • No need to turn the pile, which is an unpleasant and laborious task.
  • Quicker composting time compared to non-aerated systems.
  • Ensures adequate heat to kill parasites and weed seeds.
  • Returns nutrients to your soil.
  • Self-sufficiency: no more relying on someone else to come haul your manure off (this was a major factor for me, as my long-time manure remover retired and the person who took over was not living up to his standards).
  • Low monthly cost, after start-up (your cost will pretty much just be your time/labor when emptying the bins, fuel/maintenance for your tractor, and maintenance for your spreader).
    • Speaking of start-up costs, you may be able to defer some of your costs through a local environmental conservation program, especially if you're in a sensitive watershed area.
  • Excellent tech support/customer service if you go through O2 Compost. I found them to be very helpful both before I made the decision to purchase the system and after I built it. I had a couple of questions and issues over the last year, and Harold in particular has been great to work with.
  • My bins are much prettier than the dumpster I used to use (even if I still haven't gotten around to staining them like I planned):
Before and after!

Cons
  • High start-up cost, especially if you don't already own a tractor and/or spreader. While it's theoretically possible to compost without a tractor and spreader, I wouldn't want to do it. I can't imagine any other efficient way to distribute all that composted waste. If anyone knows of one, please let us know! Not counting the tractor, which I already owned, my start-up costs were:
    • $699 for kit from O2 Compost, purchased through Amazon with free shipping (includes bin blueprints, instruction manual, blower, thermometer, and some PVC tubes that I actually didn't use because they weren't the right size for my 6x6x4 system, and when I bought tubes at the local Home Depot the diameter didn't match up so I couldn't use the connections O2 Compost sent either) 
    • $1,225 for lumber, hardware, Suntuff lids, an extension cord to power the blower, and PVC to run the extension cord under the driveway.
If you already own a tractor and spreader and this is the extent of your costs, a compost system is much more likely to make sense financially. I had a really economical manure removal service that charged $60 per removal for a small wooden dumpster that held about 4.8 cubic yards and fit well in the space I had available. My waste disposal costs averaged out to $38/month over the first 3 years I had my farm, before I built the bins. However, all of the alternative services in my area charge much, much more (like $275 per month for a giant dumpster that wouldn't fit well in my space, and had to be removed once a month no matter how full or empty it was), and I just couldn't stomach that. If my composting costs were limited to the kit and lumber (total of $1,924), the system would have paid for itself in 6.4 years ($2,924 / $38.28/month = 76 months) vs. using the economical disposal service or merely 10 months vs. using the more expensive $275/month alternatives, which would be pretty good. Unfortunately I also ended up having to pay...
    • ...$3,965 for a new 50-cubic-foot ABI PTO-driven spreader
The spreader is where composting got me, financially. I already discussed this in my post on spreading but briefly, I planned to buy an old used spreader for about $1,000 and then discovered that all of the used spreaders I could find were either too large for my 23-horsepower tractor or painfully small (as in, a painful number of trips to the pasture to empty one bin). I had already built the bins and partially filled one by the time I figured this out, so I was kind of stuck. Now my system will not pay for itself until almost 13 years have passed. 😣 (I like to make myself feel better by using the alternative price of $275/month though, which makes it only 1.8 years.) Moral of the story: if you think you might be interested in a compost system and have a smaller tractor, you might want to keep an eye out for appropriate used spreaders for a while before you decide to invest. If you don't have a tractor at all, maybe you could train your horse to do this:
Is there something meta about a horse hauling its own waste around a field?
  • Emptying the bins is labor-intensive. I have a tractor with a front-loader and that works for a few spreader loads, but I can't scrape all the way to the ground because of the aeration tubes plus my bins are deeper than the loader arms are long. The last two 50-cubic-foot spreader loads, I have to shovel by hand. My hubby helps when he can but for either of us, it is literally back-breaking work. (Also a bit smelly! Which bothers him more than me.) It takes about 3 hours for me to empty one 6x6x4 bin and spread it on the pasture. (For whatever it's worth, I drive about 400 feet from the bins to the main entrance to my pasture, according to Google maps.) Obviously if your front-loader and/or spreader are bigger, you can do it faster. If you buy one of those tiny spreaders, good luck. It can be a one-person job but it does go faster if you have a second set of hands to hook up and unhook the spreader in between loads and shovel the muck into the front-loader while you dump the front-loader into the spreader as it fills (definitely take that job if you can, the shoveling sucks! 😜).
  • You need a good way to get waste into the bins in the first place. I already had a retaining wall with a walkway up it that I used for my dumpster, so I built my bins up against that and can dump the wheelbarrow into them. I think this is the ideal layout. When I first built my barn and didn't have that retaining wall yet, I mucked into small carts and lifted the muck up into the dumpster, and that was awful. If you have any sort of physical limitations, it may not even be possible. You could also muck into a front-loader but personally I don't want to break the tractor out every time I pick a stall, and my loader isn't large enough for the overnight waste of 2-3 stalls so I'd have to make multiple trips. Ramps are another option but a ramp with 4' of rise needs to be pretty long for you to push a full wheelbarrow up it safely. You'll also need to make sure it isn't slippery because that's a recipe for injury (if you've ever faceplanted and been run over by your own wheelbarrow before, you know that's not something you want to experience twice). The O2 Compost website has lots of examples of finished systems so you can see how other people have made theirs accessible for dumping. 
To fill my bins, I push my wheelbarrow up a gravel path and dump it in from above. The path and hinged plywood ramp were designed for use with my old dumpster and continue to work well for the compost bins.
  • Unless you can let the waste cure for a long time, it will still very clearly be stall waste, not true compost. Theoretically, given enough time to cure, the stall waste will lose its distinctive smell and appearance and turn into uniform, crumbly, dark, beautiful compost. That probably does happen if you can create good conditions and give it enough time. However, I have never once had this happen, perhaps because the longest I've ever been able to let a full bin sit is about 6 weeks. If you have fewer horses, bigger bins, or more bins, you may be able to achieve this ideal. Also, there never seems to be exactly uniform airflow or composting so sometimes there's a mass of dark, wet, sticky, fresh-looking-and-smelling manure in the middle of the bin. Hubby really doesn't like those parts! He never used to think horse manure was offensive but after helping me with this compost system for a year, he really does.
Still recognizably stall waste.

Lots of manure balls still intact.


Cautions (these aren't drawbacks to the system so much as things to think about before you invest or when you're planning your system)
  • Depending on where you live, it may be environmentally unsound or even illegal to spread manure year-round. It's not the best practice in the winter when the ground is frozen and nutrients tend to run off into surface water rather than working their way into the soil (for more on best practices for winter spreading, see here). If it freezes where you are (or if your spreading area is ever so wet for so long you can't or don't want to drive a tractor in there), you'll need a plan for dealing with the waste until you can spread it.
  • If your horses are stalled a lot or you pick dry lot/pasture waste into the bins, the Micro-Bins (4x4x4, 4x6x4, or 6x6x4) will fill up fast, unless maybe you only have one horse. Currently my horses aren't getting turnout due to lameness, and the waste of two 1,500-lb horses and one ~300-lb mini-donkey fills a bin in 2-3 weeks, yikes. When one bin is full, I have to spread the contents of the other immediately or I will have nowhere to put my muck. My waste therefore isn't getting any time to cure, though at least it's heating up enough to kill parasites and weed seeds (vs. being spread directly on the field). I wish I could have built a third bin but it just wasn't possible with the space I had.
  • "Input" composition matters! In a few ways: 
    • If you pick dry lot/pasture waste into the bins, it will not have the proper composition for aerated composting. Pure manure is too wet to heat up properly and too dense for good airflow. The thought of buying nice clean sawdust or something similar for the sole purpose of mixing it with horse crap really offends me. So, I drag the pastures rather than pick them and spread dry lot pickings directly on the pasture as well. There are other things you could mix in that might work, like yard trimmings, but I'm not sure exactly what composition they'd have to have.
    • O2 Compost recommends a porous layer over the pipes (e.g., coarsely ground brush/yard trimmings--but watch out for toxic plants if you're spreading on your pasture) and a clean buffer layer (e.g., finished compost, clean shavings) at the top of the bin. You cannot just fill the whole thing top to bottom with stall waste and expect ideal results, due to air circulation and insulation issues. So, you will need to plan what to use for these layers and you may need to pay money for them.
  • If you have a threshold that the tractor can't cross without doing damage, try not to make your bins deeper than your tractor can reach. See above about how much it sucks to shovel horse crap out of the bins by hand, and try to minimize that as much as you can. I did not think about this minor detail when I planned my bins.
  • If you can, set your aeration pipes down in the base so you have a smooth surface to scrape the manure out of. I believe this system in New York has that, and you can see how much easier it would make emptying the bins: Pleasant View Farm O2 Compost system (I also like the roof rainwater collection idea!).
The Bottom Line

This post may look negative because I devote a lot more words and space to the cons, but my overall opinion of aerated composting is in fact positive. I just want you people to know what you're getting into! I think that if you want to be self-sufficient in horse waste disposal, it is the way to go (especially if you can pay someone to shovel out the bins for you!) because it's safer and in some ways more convenient than spreading directly on the fields, and more efficient than traditional composting.

That said, if money and giant-dumpster space were no object, I might go back to having my manure hauled off just because it is so much more convenient. No worrying about whether your mixture is correct or wet enough or dry enough or getting enough air (although to be honest, I haven't spent a whole lot of time worrying about any of this, except to make sure it's staying hot enough for long enough to kill parasites, and mine has turned out okay). No shoveling and spreading. No watching the bin fill up faster than you expected and knowing that soon, you are going to have to shovel and spread. Just pick up your phone, write a check, and your stall waste goes poof! (Of course, if your manure disposal service is not reliable or tends to crash into your vehicles/buildings or destroy your driveway, it might not be this easy. If that's the case, definitely consider aerated composting.)

But since having my waste hauled off stopped being a good option for me, I think my best alternative was aerated composting. I'm also glad I went through O2 Compost because even though you can buy all of the components separately (and I didn't really use their blueprints because they didn't offer any 6x6x4 plans at that time), you get the benefit of their technical support for as long as you have the system.

Well, I'd say that was a pretty epic first post back. As always, questions and comments are welcome, either in the comments section below or by email. Happy composting!

You can read more about my experiences with the aerated compost system here:

Bin Construction
The Composting Process
Spreading
Pallet Floors for Air Pipes
3-Years of Composting (coming soon!)

Monday, March 12, 2018

Aerated Compost: Spreading

This is the third post in my series about aerated compost. For part one on building the compost bins, click here. For part two on the composting process itself, click here.

One key feature of a composting system is a way to use or to dispose of the compost. Some people find that they can give away or even sell compost to local gardeners and farmers. My plan from the beginning was to spread it on my own pasture because the whole point of composting for me was self-sufficiency.

When to spread:

You can spread your aerated compost safely as soon as it has heated up enough to kill weed seeds and parasites (monitor your temps so you know when this happens!). The longer it is able to "cure," the better it will be; it will start to look less like manure and stall waste and more like uniform, dark, crumbly mulch. I never really have time to let this happen so I spread one bin as soon as the second fills up and I need the first available again.

Because the compost gets so hot, in theory there's no reason you can't spread it on pasture that your horses are currently grazing (unlike fresh, un-composted manure, which can present health risks). Personally, I still prefer to spread it in sections of the pasture that are currently resting. (Although I only have 3 acres of pasture, it's divided into three sections for rotational grazing; see more about cross-fencing here and the benefits of rotation here). I try to spread compost on a section that I have just started resting, so it has some time to work into the soil before the horses are back on it.

Keep in mind that it's bad for the environment (and wasteful of your precious compost) to spread before heavy rains or snowmelt, or when the ground is frozen. The compost will run off and the nutrients will end up in the nearest lake or river, fertilizing algae blooms instead of your grass. Winter spreading is even against the law in some places! (Penn State offers some winter spreading best practices that you might want to review.) So, if you are going to compost find out what your local regulations are and come up with a plan for the winter (like giving it away or stockpiling it until spring).

How to spread (equipment):

Really the only efficient way to spread large quantities of compost is a manure spreader. If you have a lot of time and/or patience and/or muscles, you might devise some other method like forking it out of the bed of a pickup truck or filling your tractor bucket 1,000 times, but I don't...so I bought a manure spreader.

There are two basic types of dry manure spreaders, ground-driven and PTO-driven. Ground-driven basically means that the rotation of the wheels powers the spreading action. PTO is powered by your tractor's engine. A quick Google search will reveal that people have lots of opinions on which is best. I initially leaned towards ground-driven because they're somewhat less expensive and seem to have less mechanical complexity (I thought they might be less likely to break/require service). However, with a PTO spreader you can control the spreading rate better and ground-driven spreaders may tear up the ground more or take more passes to empty. You can also empty a PTO spreader at a standstill (for example, if you want/need to stockpile your compost before spreading). Ultimately I decided to go with a PTO spreader.

My original plan was to buy a used spreader. There are a ton of them out there that you can find at local dealers or online (try https://www.tractorhouse.com). Unfortunately, I hit a snag. Most of the used manure spreaders out there are on the large side, and my 23-horsepower Kubota didn't have the power for them. I looked high and low for several months but could not find a used spreader small enough for my tractor to pull and yet large enough to handle my compost in a reasonable number of loads. Ultimately, I had to give up and buy a new spreader, which made the whole composting project much more expensive than I had planned (I had already bought the O2 Compost system and built the bins at this point, so there was no turning back).

I chose a 50-cubic-foot PTO-drive ABI, which was delivered to my farm on a flatbed truck. It was all shiny and new and poop-free! (For about a week...) Here is it's inaugural load:


This spreader cost around $3,600 including delivery, which is much more than I had originally intended to spend. The (very old, as in 30+ years in some cases) used spreaders I saw locally were plentiful in the $1,000-2,000 range but sadly, I would need to upgrade my tractor. ABI's 25- to 65-cubic-foot spreaders range from about $3,000 to $5,000.

To fill the spreader, I park it near the bins and use the front loader to dump the compost in. At a certain point, my front loader can't reach anymore or I start interfering with the aeration pipes, so I have to start using a shovel. It's back-breaking work that is even less pleasant in the summer.

My ABI is easy to operate but doesn't spread super evenly. I'd say about 50-70% of the compost just drops out the end gate, directly behind the spreader. The rest is spun by the beaters and flies off to the sides.


Because the spreader concentrates most of the compost in narrow lines, I typically drag the field with my chain harrow after spreading. I try to drag perpendicular to the spreader trails so everything gets more evenly distributed. I do wish I didn't have to do this though! This may be how all spreaders work--I'm not sure.

The spreading process is easily the most labor-intensive phase of the composting process, but it can bring benefits to your land by returning nutrients to it.

You can read more about my experiences with the aerated compost system here:

Bin Construction
The Composting Process
Is It Right For You?
Pallet Floors for Air Pipes
3-Years of Composting (coming soon!)