Friday, January 29, 2016

USEF Young Horse Champions: Where Are They Now?

Watching the USEF Young Horse Championships, I wondered how young dressage horses who achieve that level of success fare as their careers progress. To explore this, I created the tables below, which follow the top 15 horses from each age group and each year through the end of 2015. Each year/age group is sorted by their placing at the championships and each horse's score from the championships is also listed. In future years, the horses' range of performance in USEF recognized shows at each level is shown (if I had more time on my hands I would do medians or means as well). I hope you find it illuminating!


Fine print:
  • Following each horse's name is its breed and country of birth, when known. I did my best with country of birth. If you know of any corrections, tell me!
  • Only scores from USEF recognized shows are included. Where is it known that a horse went overseas, that is noted.
  • Developing Horse tests are grouped in with the regular tests of the same level.
  • Freestyle scores are omitted.

Saturday, October 24, 2015

Pasture Management, with Sample Schedule

Pasture maintenance is one of my top priorities as a farm owner, and one of the things I knew the least about when I started out. If you are lucky enough to live in an area with good pasture, you too should prioritize its health and learn what you can about protecting it. If your pasture is run down, you may be able to revive it. A well-maintained pasture enhances the health of your land and horses, reduces erosion, beautifies your space, and cuts your hay costs. Pasture management is of course highly dependent on local conditions so check with your local agricultural extension office or cooperative for more information!

My pasture was not established. Before we bought our farm, the pasture was an unmaintained field cut twice a year for low-quality hay (entirely for tax reasons, I believe). The first time I ever mowed it, the grass was over 4 feet tall. My horses moved in over the summer and in the general bustle of the first year, I did not do any pasture maintenance other than mowing and dragging (shame on me, I know).

Sample Pasture Maintenance Schedule

This was my pasture maintenance schedule during 2015:
  • February: "Frost seed" 2 lbs of clover per acre using an Earthway hand-crank bag spreader. In retrospect, I didn't need to do this because the clover this year was more than plentiful. Still, frost seeding is a good tool to know about.
  • Early March: Remove horses from pasture after thaw to allow it to rest and regrow. They stayed in the sacrifice area for a month.
  • Mid-March: Collect a soil sample and send it to a lab.
  • Late March: Fertilize according to the soil test results, in my case with 200 lbs of 20-10-10 per acre. I bought the fertilizer at a large agricultural and landscaping supply depot, and I spread it myself using a Brinly Hardy 175 lb tow-behind spreader. There was definitely a learning curve regarding how to set the spreader, but it did the job well.
  • Early April: Overseed with a quality fescue blend, purchased directly from a seed company. The spreader came out again for this task. After spreading the seed, I dragged the pasture with a heavy chain harrow turned tines down, to rough up the surface and increase seed-soil contact.
  • Mid April: Start reintroducing horses to grass, with small but increasing increments of turnout. At this point the grass was quite green and just needed to grow, which it did! After working up to full overnight turnout (16-17 hours a day), the horses stayed on this schedule until the fall.
  • Early August: Lime according to the soil test results, in my case with a little over 1 ton per acre of agricultural lime. This I did not do myself because pelleted lime is very expensive, so I paid a local farmers coop to come out with their truck.
  • September: Overseed areas where grass had gotten thin over the summer.
I had planned to fertilize in the fall as well, but we had almost no rain between July and October, and I was afraid to spread the granules then not be able to turn the horses out because there was nothing to dissolve them.

I also dragged and mowed the field as needed throughout the year. Keep in mind that I'm in the mid-Atlantic area and elsewhere your timing will be different.

I am no expert and I can't say this was the only way to manage my pasture, or even the best, but I hope it was a good first effort.

Pasture Management Resources

To educate myself on what needed to be done, I used many resources, including:
  • Consultation with local farmers and land management experts, including my awesome arena builder who seems to know about everything to do with land and farm management.
  • Visit by the local agricultural extension agent. This wasn't quite as helpful because he wasn't an equine expert and I already had a pretty good idea of what I wanted to do, but it's definitely something to keep in mind.
  • The internet....yes, you could get lost in the web abyss, but there are a lot of good resources. Here are some links that I found useful enough to save for future reference:
    • Basic overviews, from Fairfax County (VA) government: http://www.fairfaxcounty.gov/nvswcd/newsletter/horsepasture.htm and http://www.fairfaxcounty.gov/nvswcd/horse.htm
    • Pasture and weed management hub from Penn State University, which includes detailed information on managing specific types of grasses and clovers (click on "Pasture Grasses and Forages" to find that): http://extension.psu.edu/animals/equine/pasture-weed-management
    • Intro to fertilizing pastures, from the University of Minnesota: http://www.extension.umn.edu/agriculture/horse/docs/fact_sheet__fertilizing_horse_pastures_and_hayfields.pdf
    • The basics of overseeding, including seeding rates, from the University of Kentucky: http://www.thehorse.com/articles/27812/recommendations-for-overseeding-horse-pastures
    • The basics of frost seeding, including seeding rates, from Michigan State University: http://msue.anr.msu.edu/uploads/234/43269/Frost_Seeding_Guidelines.pdf
    • A primer on dry lots from the University of Kentucky: http://www2.ca.uky.edu/agc/pubs/id/id171/id171.pdf
    • Brief primer on rotational grazing with temporary cross-fences from the University of Kentucky: http://www2.ca.uky.edu/agc/pubs/id/id165/id165.pdf
  • If you know of any good resources, please share it with the rest of us in a comment! I am always looking to learn more on the subject.

The barn is finally stained!

After months of intermittent planning, the interior of the barn is finally stained! I went with a two-tone pattern, with the aisle a lighter color to keep things bright and the stalls a darker color to (hopefully) hide dirt and deter flies.

The aisle was done with Cabot Timber Oil in Natural, and I'm happy with how it turned out (the ceiling was left unstained so don't judge it based on that):

Aisle before
Aisle after (timber oil with semi-transparent trim)
The interior of the stalls (and the trim in the aisle) was done with Cabot semi-transparent stain in oak brown. I wish I had used a darker shade of timber oil instead! The semi-trans came out blotchy in places and also really thick so that most of the wood grain is hidden. It almost looks like paint instead of stain. It's also still a bit sticky 20 hours after completion and I really hope it continues to dry and soak in. Overall kind of disappointing so far but I'm trying not to stress out about it too much. Here it is:

Stalls before
Stalls after semi-transparent stain
Lessons learned from this experience:
  • Stain your barn before you move your horses in, if possible. The reason I didn't do this is that the deck stain I initially planned to use (TWP) requires letting the wood age for 6+ months before staining. However, I didn't end up using that stain because test patches didn't look how I wanted. The job would have been much better and easier without all the dust, dirt, manure stains, mildew, etc. I also wouldn't have had to plan the application for a time of year when the horses could stay outside continuously for a couple days.
  • Test stains in an inconspicuous area first. I tested six different stains, the first three in a range of colors. The first brand (TWP) was okay but the colors weren't rich enough for my taste so I kept looking. The second (Armstrong Clark) and third (Ready Seal) came out pale, blotchy, and hideous. The fourth one (Cabot semi-transparent in oak brown) was what ended up going in the stalls but I think the painters put on too many coats because it turned out much more opaque than the test patch. The fifth one (Cabot semi-transparent in cavalry) was for the aisle but it was way too yellow and opaque. The sixth one was the timber oil that ended up going in the aisle. I am so glad I tested the fifth one first because it was really ugly and the sixth one turned out quite nice!

Friday, August 21, 2015

Small Farm Layout

Before you even start building your farm, the first major planning step is figuring out where you're going to put everything you need. There are tons of sample small-farm layouts on the internet and in books like Cherry Hill's Horsekeeping on a Small Acreage. Most likely, none of those will fit your property layout exactly, but they are a place to start.

The only obvious thing when I started was where the pasture would go, in the old hay field. I also knew where I wanted to put the gate to the pasture, just far enough up the hill to stay dry. Beyond that, I had to work around a large number of natural and man-made obstacles when choosing where to put everything else (see the "before" map below).

Aerial view BEFORE farm construction, annotated with the property's features.
The first step for me was siting the barn. Once I decided that the old barn was not worth renovating, the obvious location for the new barn was the old house foundation. This was in close proximity to the driveway and the detached garage, which I now use for hay and equipment storage. Its central location also allowed reasonable access from the house and to the pasture, the detached garage I would use for storage, and the arena. Plus it made use of many cubic feet of concrete that would otherwise need to be demolished at significant cost.

As you can see in the "before" map below, the marshy areas and drainage culvert were an obstacle between the obvious barn site (the old house foundation) and the pasture. Therefore I could not connect the pasture directly to the barn via the dry lot, as I would have liked. Placing the barn on the other side of the culvert was not possible without either creating drainage issues by putting it at the bottom of the hill (which slopes up away from the culvert) or placing the barn very far away from the house at the top of the hill. So, the barn would have to be at a distance from the pasture.

To connect the barn and pasture, I added a path that would prevent mud. The topsoil was stripped and stonedust added on top. The path was continued into the pasture where the gate and water trough are, also to prevent mud. It's priceless! The old wooden bridge, which was a total hazard, was replaced with a drainage culvert over which the stonedust path could continue.

I extended the existing fence line visible at the top edge of the "before" map to enclose the entire pasture, with curved corners where possible. When my horses proved to have a taste for tree bark, I had to fence the trees off with small boxes.

For trailer parking, I widened the end of the existing driveway so I could turn around in front of the garage (see this previous post).

The arena was the biggest earth-moving project by far. It ended up going where the old, decrepit barn had been. The area wasn't great for turnout because the septic field was in one corner (obviously not a corner where the arena went), but it was close to the barn and visible from the house for safety. For an explanation of how I chose the site for the arena, see this previous post.

When the arena builder was here he also excavated a corner for me and built a retaining wall and ramp so that I could push a wheelbarrow right up to the side of my manure dumpster and tip it in. (Before, I was using a small muck bucket and physically lifting the thing five feet in the air to dump it. Not great for a person with back problems...) There was only one logical place to put the dumpster with this setup, where there was already a corner with a steep slope above it. That ended up being maybe a little too close to the barn as far as flies and odors go, but it is convenient for chores, especially in the snow. I have never smelled the manure pit from the house, thank goodness.

Halfway through my first (awful) winter I added a small stonedust dry lot behind the barn that the stalls now open onto. It allowed me to rest my field in early spring to let the mud die down and the grass grow. Now two of my boys (Dominick the Donkey and my 2-year-old) have full-time access via their Dutch doors, which are almost always open to the dry lot. They use it to play, roll, see me coming from the house at dinnertime, etc.

During the winter I also added a CR-6 pad for my pasture Slow Grazer box. The horses liked it so much that they spent all day creating mud around it. The CR-6 helped a lot. Picking manure off it is a terrible chore though, especially when everything is frozen, so I plan to cover it with a layer of stonedust before winter hits this year. I put the pad far enough into the field to give clearance for horses to go around it and each other, but not so far that it was a pain to check/refill or that it would require destroying a patch of really good grass (the stuff by the gate is always a little thin).

As you can see, transforming this property into a functional small horse farm involved a lot of different improvements! However, the result is well worth it and I'm not sure I could have done much better given my constraints. (If you do see something you think could be improved though, please leave me a comment! I'm always on the lookout for good ideas.)

Aerial view AFTER farm construction, annotated.

Sunday, August 16, 2015

Keeping Hay Away From the Mini Donkey

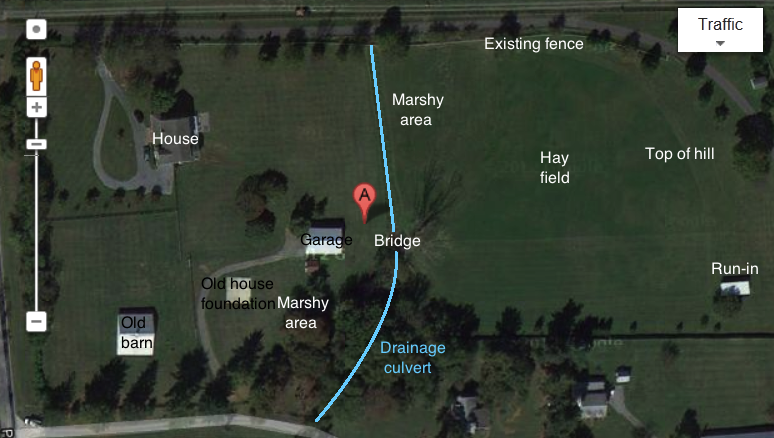
One challenge raised by keeping minis as companion animals to horses is maintaining the minis at a healthy weight. Many of them simply cannot handle as much turnout and hay as horses can. This is especially true of mini donkeys, who evolved as desert animals. This post discusses the methods I tried to allow the horses access to the hay they require without overfeeding the donkey.

Dominick the Donkey dominates my 2-year-old horse (Little R) by sheer force of personality, tiny flying hooves, and long grumpy ears. (This despite R outweighing him by probably 900 lbs and almost being tall enough to step over him...) Therefore, if he wants Little R's hay, he will take it, and R will stand there and watch him eat it. I keep hoping the poor baby horse will learn to stand up for himself a little, but no luck so far. In the meantime, I have tried a number of things to keep the hay out of reach of Dom and in reach of the sweet, spineless horse.

1.  Hanging hay out of reach

This is the most obvious solution, because of the height difference (duh). The first thing I tried was hanging R's NibbleNet out of Dom's reach. This worked to stymy the donkey, but I wasn't happy with how it forced R to invert his neck in order to eat. Also, if you have a taller mini or a shorter horse, you may have to hang the hay so high that hay dust will fall into the horse's eyes. After a while R started leaving hay in the net every day when he used to clean it out, and I wondered if the angle was making it difficult for him to eat, so I decided to try some other options.

High-hung NibbleNet.

2. Physical barriers

My second idea was to try to block Dom's approach to the hay somehow, so that he couldn't get close enough to eat it. My main concern with this was doing it in a manner that would be safe for R, who can be a little klutzy. So, I first tried mounting a corner feeder underneath a small hole hay net:

Corner feeder as donkey shield.
Not big or wide enough, drat!
One physical barrier that I didn't try is a homemade corner feeder. The idea behind this, pictured below, is to make it tall enough for the horse, but not the mini, to reach down into. I decided not to try this because Little R has a habit of pawing at his food and I was afraid he would hook a leg inside the feeder, but it seems like a neat option.

If you want to try this one, you can find instructions about a quarter of the way down this page from PATH International (CTRL + F "corner hay feeder" to find it quickly). It looks very easy to build and does not require many materials.

Corner hay feeder, photo from PATH website.
3. Extra tall Slow Grazer

This option is the winner so far. Over the winter I put together a Slow Grazer box with extra-tall sides (I used a wider pressure-treated board for the base to increase the height). This allows the horses to eat while keeping Dominick out of the buffet. I resisted putting the box in R's stall at first because he likes to nap and, like I said, he can be klutzy. Outside the stall wasn't a good option in the summer heat and humidity, because R would have to stand out in the sun all day and rain/humidity would cause the hay to get moldy. So, I eventually decided to try it in the stall and so far so good!

The extra tall Slow Grazer thwarts Dom and for some reason empowers R to pin his ears and drive Dom away if he gets too pushy.

Tuesday, August 11, 2015

Finishing Stall Walls


My barn was designed with way too many nooks, crannies, ledges, and protruding wooden beams inside the stalls. It's something I didn't think about much before but I now drool in envy over stalls with completely flat walls. Neither of my horses are terrible chewers and thankfully they can get lots of turnout, but all the protruding boards and edges are so tempting that they've taken some chunks out anyway. To put a stop to that, I am going to make the walls as flat as possible by adding boards or plywood between the header and the kickboards (rear of stall) or door/grille frame (front of stall).

Here are some "before" pictures:


Update 8/24: I've finally started framing out the recessed spaces and adding pine boards purchased at 84 Lumber. In-progress photos are below.

Close-up of new boards. Pardon the poor lighting!
Framing only on left; new boards in place on right.


Thursday, July 23, 2015

De-Grass-ing the Outdoor Riding Arena

After a few weeks of disuse and a lot of rain, my 8-month-old ring suddenly tried to turn into a lawn. Even though I dragged it! This post chronicles some of the things I did to combat this grass, which turned into a monthlong battle.

1. Grooming

I started by dragging the arena twice in one week, using a chain harrow with the tines pointed down. They were both nice long sessions with a variety of patterns. This met with moderate success. Some of the grass was uprooted. I know this because after dragging I spent half an hour picking clumps of grass out of the footing and trying not to lose too much of my rubber. However, I initially thought dragging did a much better job than it did because it does flatten the grass and cover it with dirt. A couple days later, it popped up again! Clearly this would require more than dragging.

Look, problem solved!

Back to the drawing board.
2. "Biological controls" (i.e. donkey grazing)

Nope, this didn't work (he trimmed the grass without uprooting it) but it sure was cute!


3. Hand-weeding

I never felt this was a particularly good option for the large amount of grass that was growing, because there just aren't that many hours in the day. However, I do it with the edges on a regular basis so I did try it with one corner. It took 45 minutes to do about 4 feet in each direction from the corner, and I didn't even get all of it because I ran out of steam. The other problem was that some of the roots had worked their way down into the base of the arena, so pulling them up also pulled up chunks of base! Eek. My conclusion is that weeding by hand may be useful as a regular maintenance measure, but cannot solve a problem that's gone as far as mine has. I think when I do pull things by hand, I need to kill the roots and release their grip on the base first. Which brings us to...

4. Chemicals

After the failure of the dragging and weeding, I bought a 1.5 gallon sprayer from Tractor Supply for $10. Hoping to avoid harsher chemicals, I first tried a homebrew of vinegar, salt, and dish soap (ratio is 1 gallon vinegar : 1 cup salt : 1 tbsp dish soap). At first I thought this was magic because within 12 hours the grass turned dead and yellow. However, it never seemed to spread to the roots and a week later it was all greening up again. By two weeks out it was almost indistinguishable from the untreated areas (and my sprayer was still full of persistent soap suds). We had a lot of rain during that time so maybe in a drier climate it would be sufficient.

One day after application, the vinegar spray seems like a winner.
8 days later, the grass is turning green again.
I finally resigned myself to the full-on chemical solution: glyphosphate (the active ingredient of Round Up). I bought an off-brand, Compare-n-Save 41% concentrate, a gallon of which costs $27 and supposedly makes 85 gallons of spray, because it was far more economical than Round Up. It mixed easily (aside from the added soap suds) and doesn't have a noticeable odor.

It took weeks to actually get the spraying done because we have had so much rain. Every day I had time to spray, they were calling for thunderstorms and I didn't want all my time and money rinsing off with the rain. When I finally got it done, the application process was rough. It took about 5 hours in three sessions for me to spray the entire 66'x198' arena, including the edges. Lugging the sprayer around with the carry handle or the unpadded shoulder strap got old fast, and sweeping the wand back and forth caused some repetitive stress pains (which seems really pathetic, I know). I think down the road I may want to invest in a backpack sprayer or, better yet, a tow-behind for my tractor, but I couldn't say no to the sprayer I have for $9.99.

After the glyphosphate killed off all the grass, a few sessions of dragging uprooted it all. Now it's just an ongoing maintenance task to prevent recurrence.

The photos below chronicle the progress:

3 days after spraying the far end (yellow area).
8 days after spraying the far end (now brown).
8 days after spraying the edges, casual raking uproots many clumps of grass.
After spraying entire arena, before dragging.
After dragging. Victory!!!


Monday, June 8, 2015

What Happens When You Leave Your Farm for Two Weeks...

I was recently out of the country for two weeks and distributed the two horses, donkey, and two dogs to three different off-site caretakers. Apparently these are the things you should expect to find when no one uses or maintains the farm for a couple weeks:

  • A barn full of spiders. Thank goodness that was the worst thing in there. I closed up all the windows and doors hoping to prevent the starlings from moving in, and apparently that worked. The spiders, however, found the newly draft-free space very enticing. At least they're easy to evict and not so messy.
  • An overgrown pasture that takes twice as long to mow as usual. Normally two weeks is my mowing interval in the spring anyway, but I was asked not to mow it by the guy who was going to spray for weeds while the horses were gone (who, by the way, didn't show up until a week after I got back anyway). So it didn't get mowed for over a month and was completely out of control when I got back. On the right side of this photo is Dominick the Donkey almost disappearing into grass as tall as he is:
  • An arena full of grass, no joke. I dragged it right before leaving hoping to prevent this, but it didn't seem to help. I got my arena footing secondhand from a fancy dressage barn that replaced it after just one year of use for no good reason (lucky me!). They weren't as diligent about "removing organic matter" as I am, and this is the result:

  • Groundhogs living under your hay barn. My 17-pound dachshund has already taken care of one small intruder, but the others remain at large. I'm glad they chose their home there instead of in the pasture though, at least so far.

Friday, May 15, 2015

Shutters for the Barn

Update 5/18/16:

Well, it took me a whole year but I finally added vinyl board and batten shutters to the barn! I bought them at ArchitecturalDepot.com and they were very reasonably priced! I really like the way it looks, much less "naked."


Original entry:

To me, the aisle side of the barn looks like it's missing something. When the windows (which slide from the inside) are closed, it's a bit better because they have six panes with white trim separating them. However, the windows are really only closed in the dead of winter. This is what it looks like most of the time (there are four windows total but I cut the fourth one out because the wash rack is in front of it):


How can I dress this up? Black shutters to match the house?

(Side note: Hmm, that photo makes it look like my barn is pitch dark inside, which is not the case. In fact I hardly ever have to turn the lights on in spring, summer, and fall. I guess it's just a contrast issue.)

Mock-ups of contrasting trim:

From left to right, above:
    A) Trim outside the frame
    B) Trim overlapping the frame
    C) Original
From left to right, above:
    B) Trim overlapping the frame
    C) Original
From left to right, above:
    A) Trim outside the frame
    B) Trim overlapping the frame
Yes, the black lines are duct tape. :-D

Thursday, May 7, 2015

Double Rainbow Over the Farm

This is the kind of sight that makes all your hard work worthwhile!!!


If you look really closely on the right side of the horses you might be able to see the tiny gray blob that is the donkey.