Ideally my horses would be out 24/7 but with limited pasture space I can't afford to do that, so they spend 8-15 hours off the grass, depending on the season. To make this easier on them and me, I have tried a variety of slow feeder options. There are two main reasons to use a slow feeder:
- Slowing hay consumption. I hate the thought of my horses eating all their hay in an hour or two and then standing around for the rest of the day. It's not healthy and it leads to boredom, which tends to make horses destructive. So, everyone has some sort of device to slow their hay consumption down.
- Containing hay waste. Hay fed on the floor or even in an open tub on the ground tends to get dragged or dropped around the stall. It then mixes into the bedding, which makes it unlikely to be eaten and makes stall cleaning more laborious. Most of the slow feeder options also contain waste in some way, even if just by reducing the horse's ability to take a giant mouthful that can then dribble out of his mouth as he walks around the stall to look out the window or say hi to his neighbor.
There are many varieties of slow feeders out there. I have tried three different ones that I will discuss here:
- Small hole hay nets
- Nibble Nets
- Slow Grazer boxes
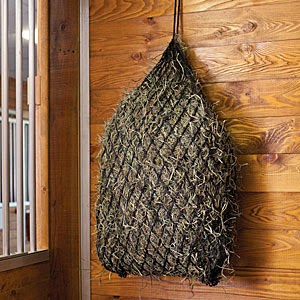
1. Small hole hay nets
Just like a regular hay net but with smaller holes to slow down consumption (and maybe reduce the risk of entanglement). If you already own regular hay nets, you can also try double bagging the hay in those so the holes overlap.
Pros:
- Inexpensive (although in my experience the under-$10 ones would break within a few days, SmartPak's $16 one is quite durable).
- May be easily repaired, depending on what breaks and how handy you are.
- Allows chaff to fall out.
- Contains waste somewhat but not as much as the Slow Grazer.
Cons:
- Doesn't allow for eating in natural head-down position, at least not without increasing the risk of entanglement.
- Hooves and legs can get stuck in the holes.
- If hung high enough to prevent entanglement, allows hay particles to fall into eyes.
- Not very durable, and a poor choice for horses that are hard on equipment.
- Some horses have a tough time emptying the net completely.
I never used a net for my mini-donkey because he has teeny tiny hooves and legs and I was worried he would get stuck. I stopped using these altogether after my giant warmblood yearling got his leg stuck. Thankfully he was uninjured other than a skin rub because the hay net eventually broke. My poor non-horsey mother was watching the whole thing in a panic but didn't know how to help safely, and called me in tears. For her mental health as well as my own and of course the safety of my horses, I couldn't use these anymore. It surprised me when it happened because the holes seemed way too small to catch his big feet, so I decided I couldn't be sure it wouldn't happen to anyone else either, and I didn't want to take the risk. Now I just use them for trailer rides and the like.
2. Nibble Nets
Heavy-duty vinyl sides with tough webbing in front. The horses eat through the front and you refill it from the top. They also come in different shapes and sizes, with some that go directly on the ground and some that resemble punching bags.
Pros:
- Durable.
- Very effective at slowing hay consumption and containing waste.
- Reasonably easy to fill, although I can't stand the two D-ring belt-style closures (see picture). I struggle to close them when wearing winter gloves, and can't imagine why they aren't just snaps.
- Horses can eat every bite of hay out of it.
- Allows chaff to drop out the bottom.
- Contains waste somewhat but not as much as the Slow Grazer.
Cons:
- Relatively expensive (ranging from about $50 to upwards of $100 depending on the style and capacity).
- Only certain models allow for natural head-down eating position. I hang mine at about chest level so at least they don't get hay in their eyes, but they still tend to turn their heads sideways to eat.
I bought a
9" Nibble Net with 1.5" holes for the yearling (now 2) after the small hole hay net debacle. The increased safety gives me peace of mind. Dominick the Donkey uses a
Nibble Net Picnic (see cuteness below). It contains one large or two small flakes, which is about all he can eat in half a day without turning blimpy. His has the smallest holes (1.25") but he is also so small and skilled that he can empty it fairly quickly. His is really easy to fill because it doesn't have those D-ring straps. He is picky, believe it or not, but when I buy fine second-cutting hay that is minimally stalky, waste goes down to zero.
If you choose a Nibble Net, I recommend buying one size larger than you think you need (unless it's for a specific purpose, like a picnic for a mini). You can always fill the nets less, but in my experience they hold fewer pounds of hay than advertised and stuffing them super full makes them a struggle to close.
3. Slow Grazer boxes
Homemade wooden boxes with a heavy grate that sits on top of the hay, slows consumption, and drops with the hay level so the horses can keep eating all the way down. There are quite a few similar varieties and brands, but I bought the plans and grates online
here and their customer service was very good.
 |
| 2x4 single bale model with "lift kit" to keep the donkey out |
Pros:
- Allows for natural head-down eating position.
- Virtually eliminates waste because most hay that falls out of the mouth stays on top of the grate for later consumption.
- Needs to be filled less frequently than other options because it holds so much hay.
- Sturdy and stable.
- Safer than outdoor slow feeders made with pipes that can catch legs or rust and cause wounds.
Cons:
 |
| 4x4 double bale model for the pasture |
- Very expensive (between $100-200 per box including lumber, hardware, and grate) and somewhat time-consuming to assemble, but can be a fun project if you like that sort of thing.
- Not as labor-saving as I'd hoped. To prevent hay from getting packed so tight that the horses cannot pull it out, I have to fluff it manually. I hoped that I could simply drop a hay bale in there but it quickly becomes difficult for them to eat, so now I add an armful of flakes more frequently and pull them apart with my fingers.
- A bit of a struggle to fill sometimes until you get the hang of it. I figured out how to prop the lid of the 4'x4' open with the grate for filling, but it still requires a lot of heavy lifting compared to a hay net.
- Takes up a lot of space in a stall. The 2'x4' model has a footprint slightly larger than that and it's also tall enough that buckets can't really be hung above it. I worry sometimes that my horses might lie down in their stalls less because they're crowded by the feeder.
- Needs to be cleaned out regularly and protected from rain if kept outdoors, or the chaff and hay at the bottom will get moldy. I am thinking of upgrading my wood floors to a fine mesh with wooden supports, so the chaff can fall out, but I would still have to clean underneath the feeder.
- Heavy and difficult to move on one's own.
- Horses may chew on wood if you let it sit empty and they get bored. This hasn't been a problem for me but I could see it happening. It also may be a bad choice for cribbers.
- Some people worry that metal grates will attract lightning or cause wear of the front teeth. Two out of my three equines carefully pull the hay through with their lips and never bite the grate. The third one is an aggressive hay eater with wonky teeth and has worn the finish off the grate, but the dentist found no signs of unusual wear. I plan to keep checking and replace his metal grate with a Nibble Net sheet if needed.
- If you have an aggressive hay eater like I do, the banging of the metal grate against the lid of the box can be loud and somewhat annoying.
The list of cons for the Slow Grazer boxes is deceptively long, and glancing at that you'd think I might not still be using them, but I am. For outdoor use in a pasture or dry lot in the winter, it's hard to beat because of the convenience and waste reduction. I have a 4'x4' in the pasture, a 2'x4' in one stall, and a 2'x4' in the dry lot attached to the barn. The 4'x4' is on a gravel pad so the horses don't have to stand in the muck, and they wasted basically no hay this winter, which is a wonderful thing. The only problem I ran into is that my dominant horse would not allow his younger brother to eat at the same time as him, even with 16 square feet of hay surface to choose from, so they took turns sort of. On super cold days or when the ground was covered in snow, I would hang a Nibble Net on the fence so everyone would have something to munch on at all times.
I actually built one 2'x4' extra tall by using wider pressure treated boards for the base (2"x12"), so Dominick the Donkey can't partake but the horses can. It is kind of sad, but he would be obese and unhealthy on free-choice hay. He does think the box is a good scratching post though.
This is how I prop it open to fill it. No question which one of the two animals is the brighter bulb: